Welcome to the Meetrix NetBox developer guide for Google Cloud Platform! NetBox is the open-source source of truth for network infrastructure. It brings IP address management (IPAM) and data center infrastructure management (DCIM) together, so your sites, racks, devices, cables, prefixes, IP addresses and VLANs live in one database instead of a dozen spreadsheets. Because everything is reachable over an API, NetBox is also where automation reads its inventory from, which our article on the benefits of Ansible automation covers from the playbook side.
The Meetrix GCP image runs NetBox 4.7.4 in Docker on Ubuntu 26.04, with PostgreSQL 18, Valkey, a background worker, an Nginx reverse proxy with automated SSL, and a daily database backup that can upload to Cloud Storage. This guide walks you through launching it from GCP Marketplace, pointing DNS, signing in, adding your first site and prefix, creating an API token, and keeping the database backed up. For what the image includes, see the NetBox store page. If you run on AWS instead, the same product is covered in our NetBox on AWS developer guide.
Prerequisites
Before you begin, make sure you have the following:
- Basic Google Cloud Platform knowledge, including Compute Engine.
- An active Google account with a GCP project and billing enabled.
- A domain name you can manage DNS records for.
- Optional: an existing Cloud Storage bucket, if you want database backups copied off the VM.
Launch NetBox from GCP Marketplace
Step 1: Find the Product
- Log in to your Google account.
- Go directly to the product page: NetBox IPAM & DCIM: Open Source Network Source of Truth on GCP Marketplace
- You can also browse all Meetrix products at the Meetrix Solutions Page.
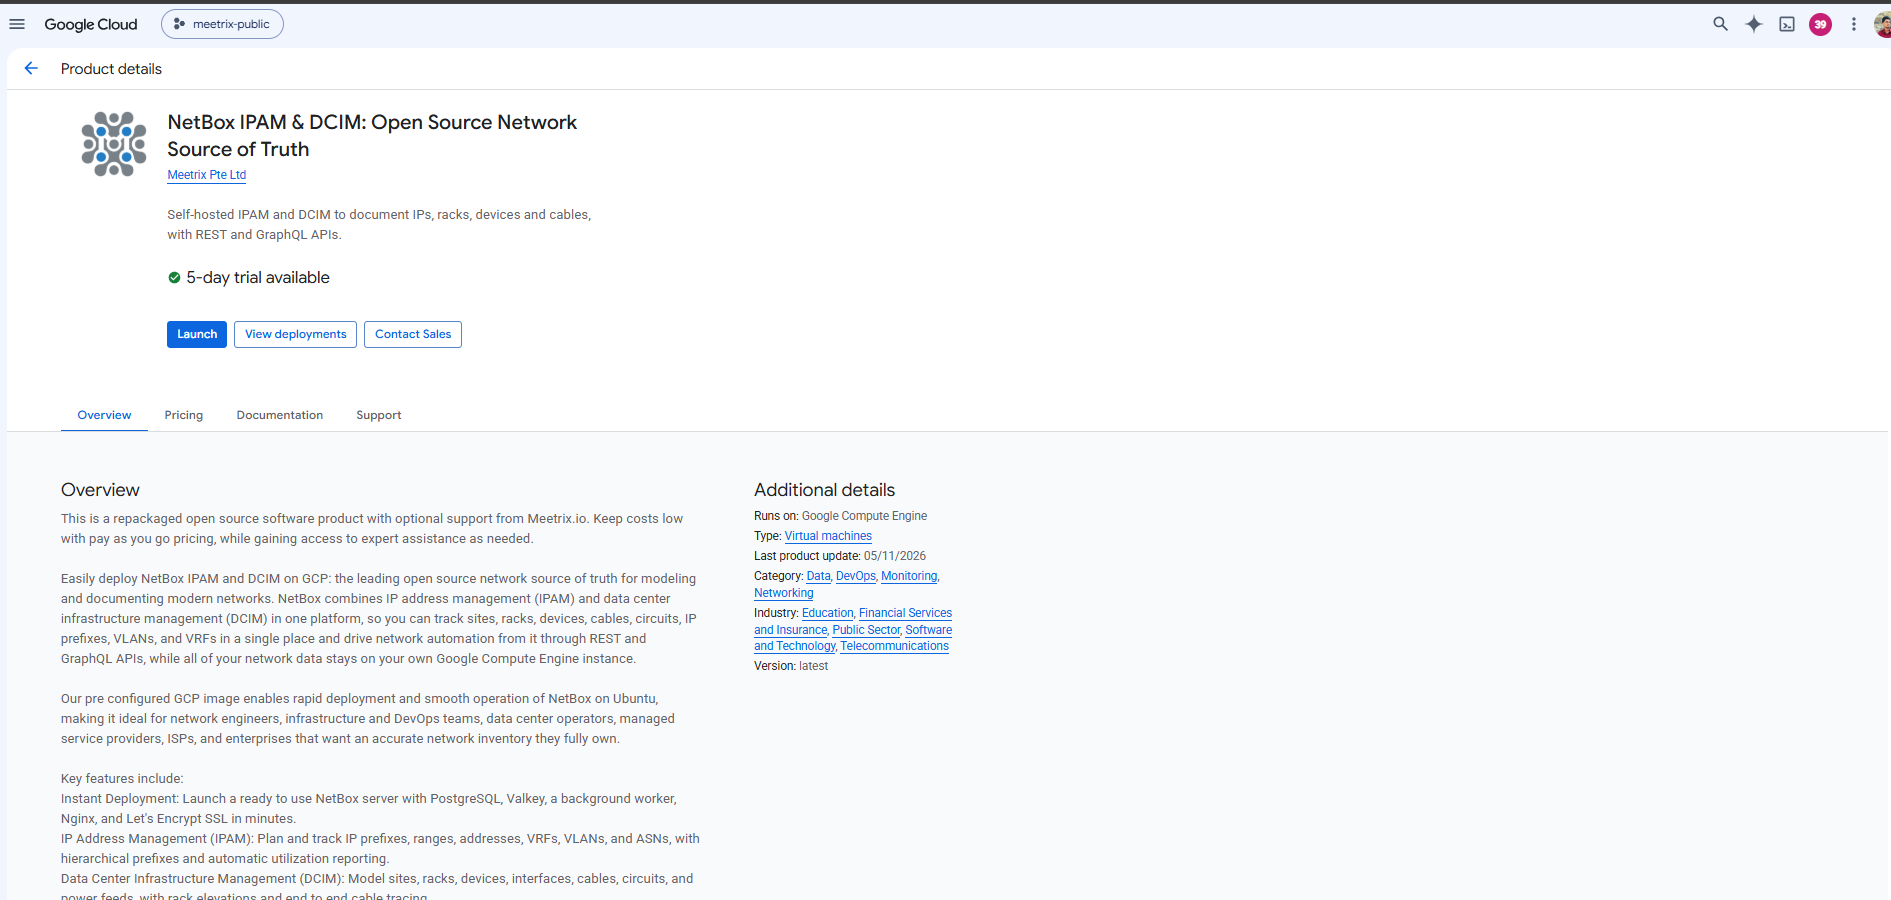
- You will see the following product listing page. Click Launch.
Step 2: Accept the Agreement
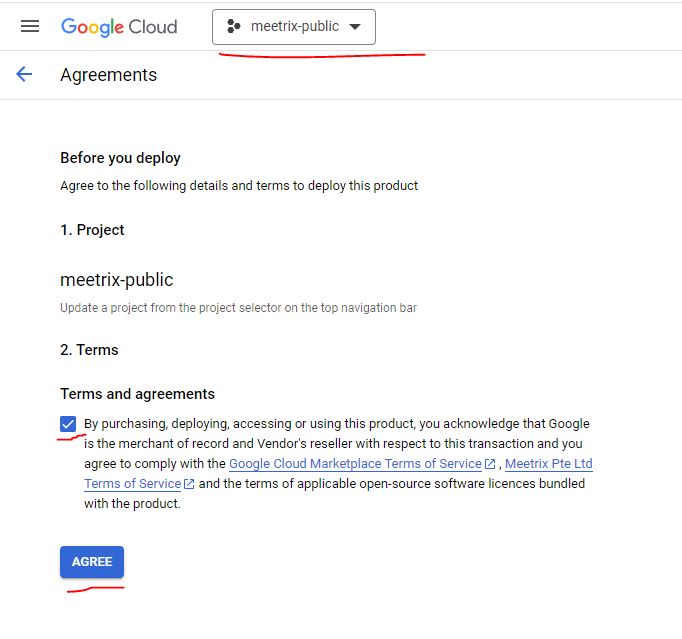
- Select your GCP project from the project selector at the top.
- Tick the terms and agreements checkbox.
- Click AGREE.
Free Trial
This product includes a 5-day free trial with up to USD 50.00 in licence fee credits. To activate it, tick I accept the solution trial Terms and Conditions at the bottom of the deployment form before you click Deploy.

Trial note
Configure Your NetBox Deployment on GCP
You will see the deployment configuration form. Fill in the fields across the following sections:
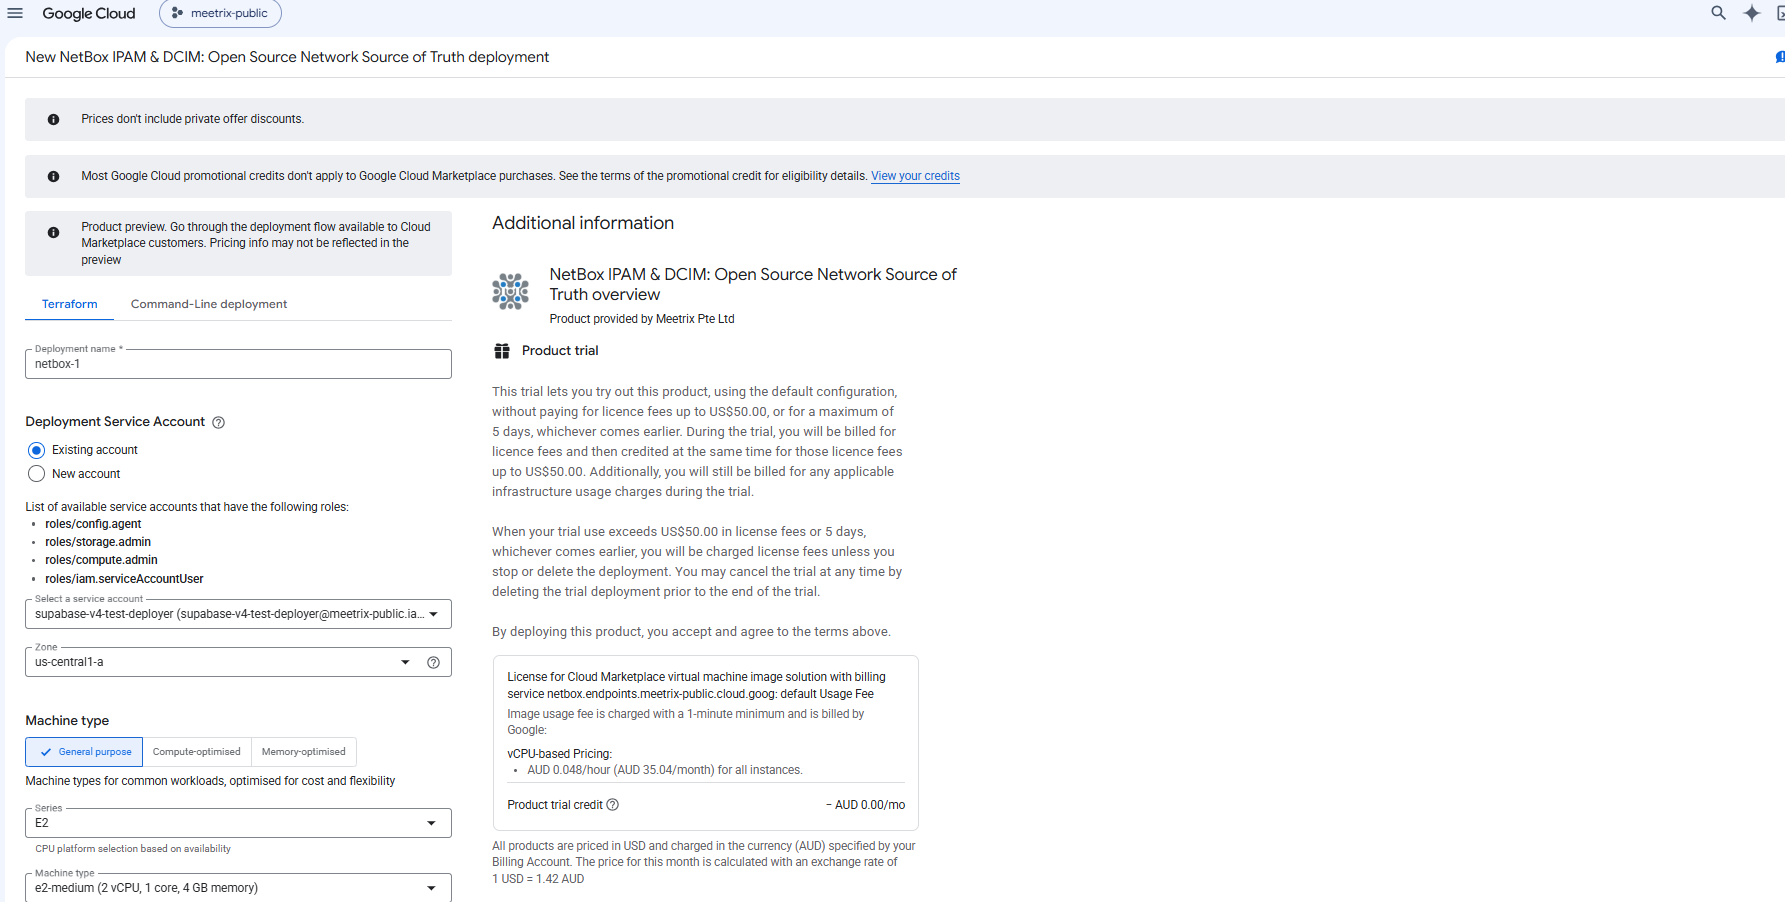
General
- Deployment name: A unique name for this deployment. The VM is named after it, with
-vmadded. - Deployment Service Account: Use an existing account that has the
roles/config.agent,roles/storage.admin,roles/compute.adminandroles/iam.serviceAccountUserroles, or choose New account to have one created with them. Storage Admin is what lets the deployment give the VM upload access to your backup bucket. - Zone: Select the GCP zone closest to your users.
- Machine type: The default
e2-medium(2 vCPU, 4 GB RAM) runs NetBox, its worker, PostgreSQL and Valkey comfortably for small and medium networks, and is the smallest type the form accepts. Choosee2-standard-2or larger for large inventories or heavy API automation.
GCP shows an estimated monthly cost, made up of the Meetrix licence fee and the infrastructure fee for your machine type and disk, before you deploy.
Boot Disk
- Boot disk type: The default
Balanced Persistent Diskis recommended. - Boot disk size: The default and minimum is 20 GB, which is enough for most inventories and a week of local database backups. Choose a larger disk if you plan to upload many images and attachments to NetBox.
Networking
- Network / Subnetwork: Leave as
defaultunless you have a custom VPC. - External IP: Leave as
Ephemeral, or choose a reserved static IP if you want the address, and your DNS record, to survive a stop and start of the VM. - Allow SSH (TCP port 22) from the Internet: Enabled by default. Restrict the Source IP ranges for SSH traffic field to your own IP range if you want to limit SSH access.
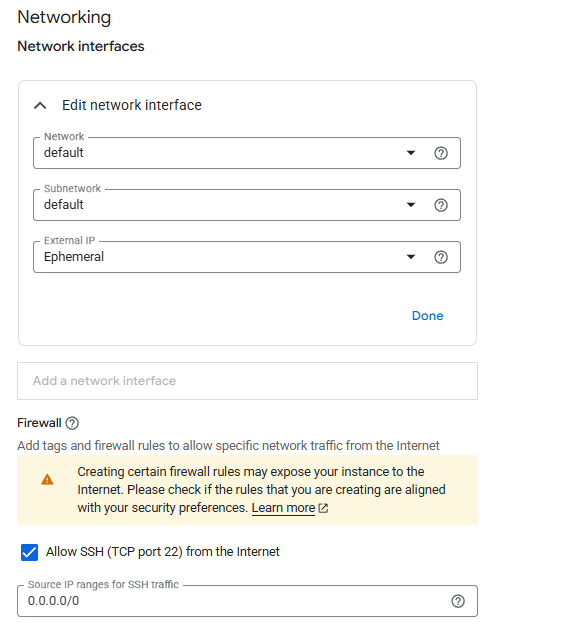
The deployment also opens ports 80 and 443 to the VM for the NetBox web interface and API. Leave Allow full access to all of Google Cloud Platform APIs on the VM unticked; NetBox does not need it, and the VM gets the Cloud Storage access it needs for backups automatically when you set a backup bucket.
Application Settings
- Domain name: The domain for your NetBox server (e.g.
netbox.yourdomain.com). Point your DNS A record to the VM's external IP after deploying. - Admin email: Used for SSL certificate registration via Let's Encrypt, and as the email address of the NetBox admin user.
- Backup bucket (optional): The name of an existing Cloud Storage bucket, without the
gs://prefix. The database is backed up on the VM every day either way; if you set a bucket, each backup is also uploaded to it. See Back Up the NetBox Database below. - Admin password: The password for the NetBox admin user you sign in with. It must be 8 to 64 characters long and can contain only letters, digits and the characters
!@#%^*_+=.,-. Store it securely.
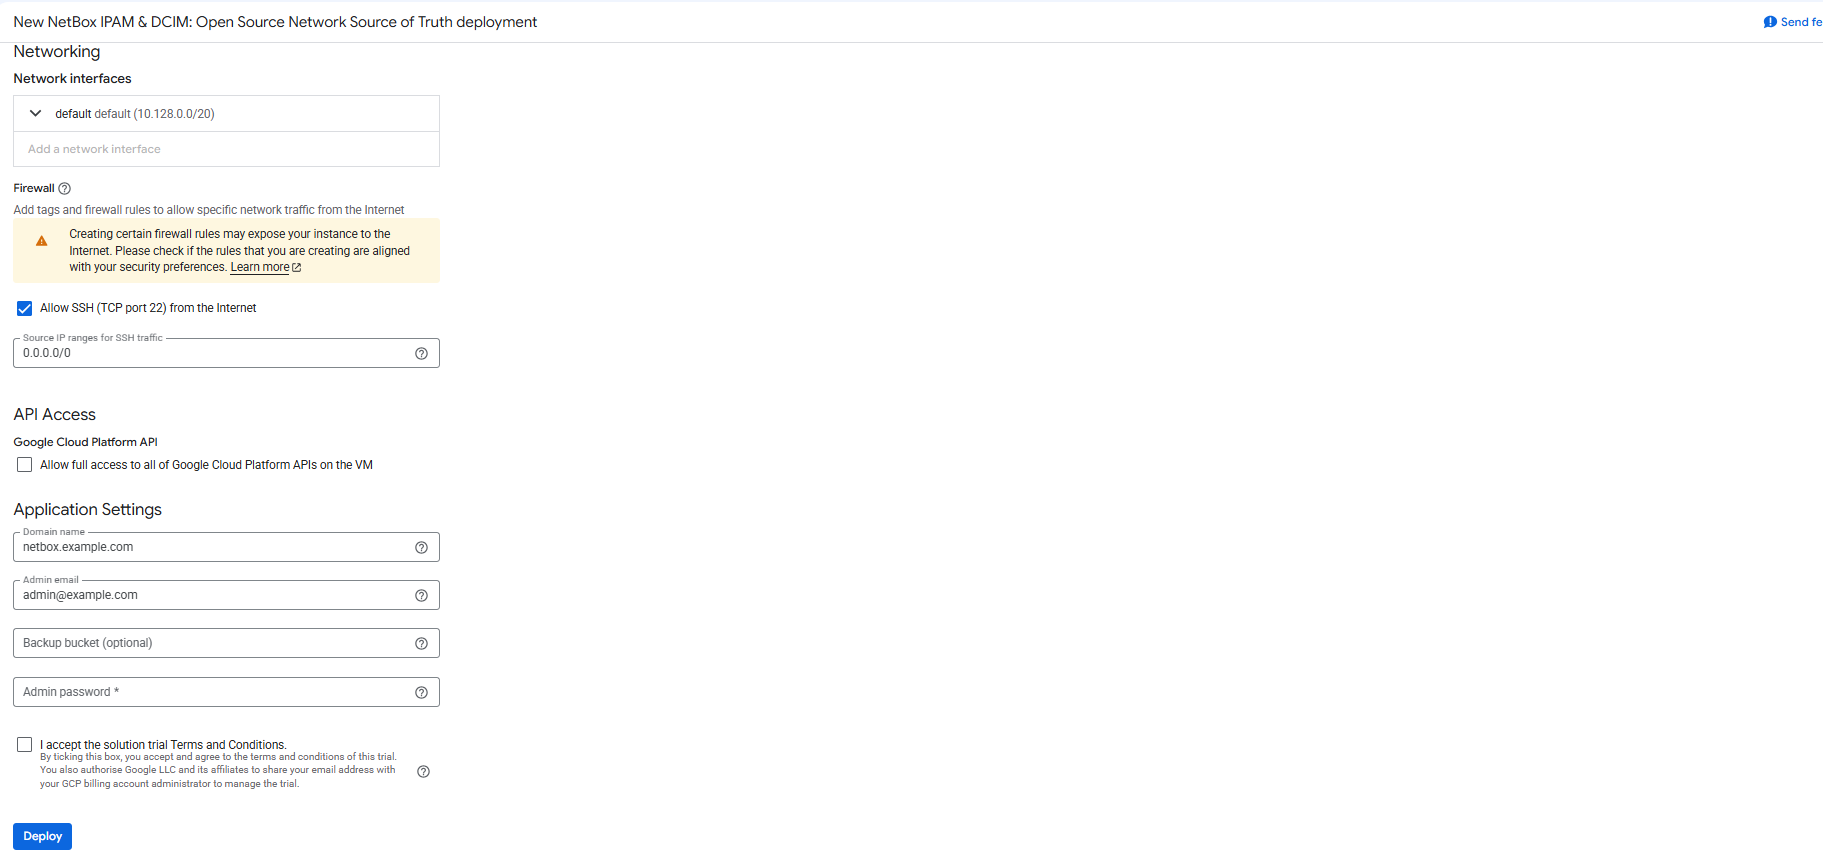
Tick the trial checkbox if you want the free trial, click Deploy, and wait a few minutes for the deployment to complete. Allow about 5 more minutes after that for the first boot, while the VM generates its own database and cache passwords, starts NetBox and creates the admin user.
Point DNS to Your NetBox Server
Step 1: Get the External IP
- Once deployment is complete, click the VM instance resource name in the deployment details.
- Copy the External IP from the Network interfaces section.
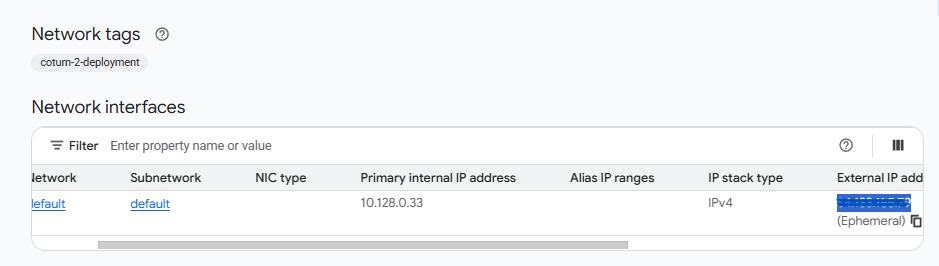
Step 2: Create a DNS A Record
- Go to your DNS provider.
- Add an A record pointing your NetBox domain (e.g.
netbox.yourdomain.com) to the copied external IP. - Wait for DNS propagation before proceeding (typically a few minutes to 1 hour).
DNS must propagate first
Access NetBox
The deployment outputs list two addresses on the VM's IP over plain HTTP, which work straight away: site_url (the NetBox home page) and admin_url (the login page). Once DNS has propagated and SSL has been issued, open your domain instead.
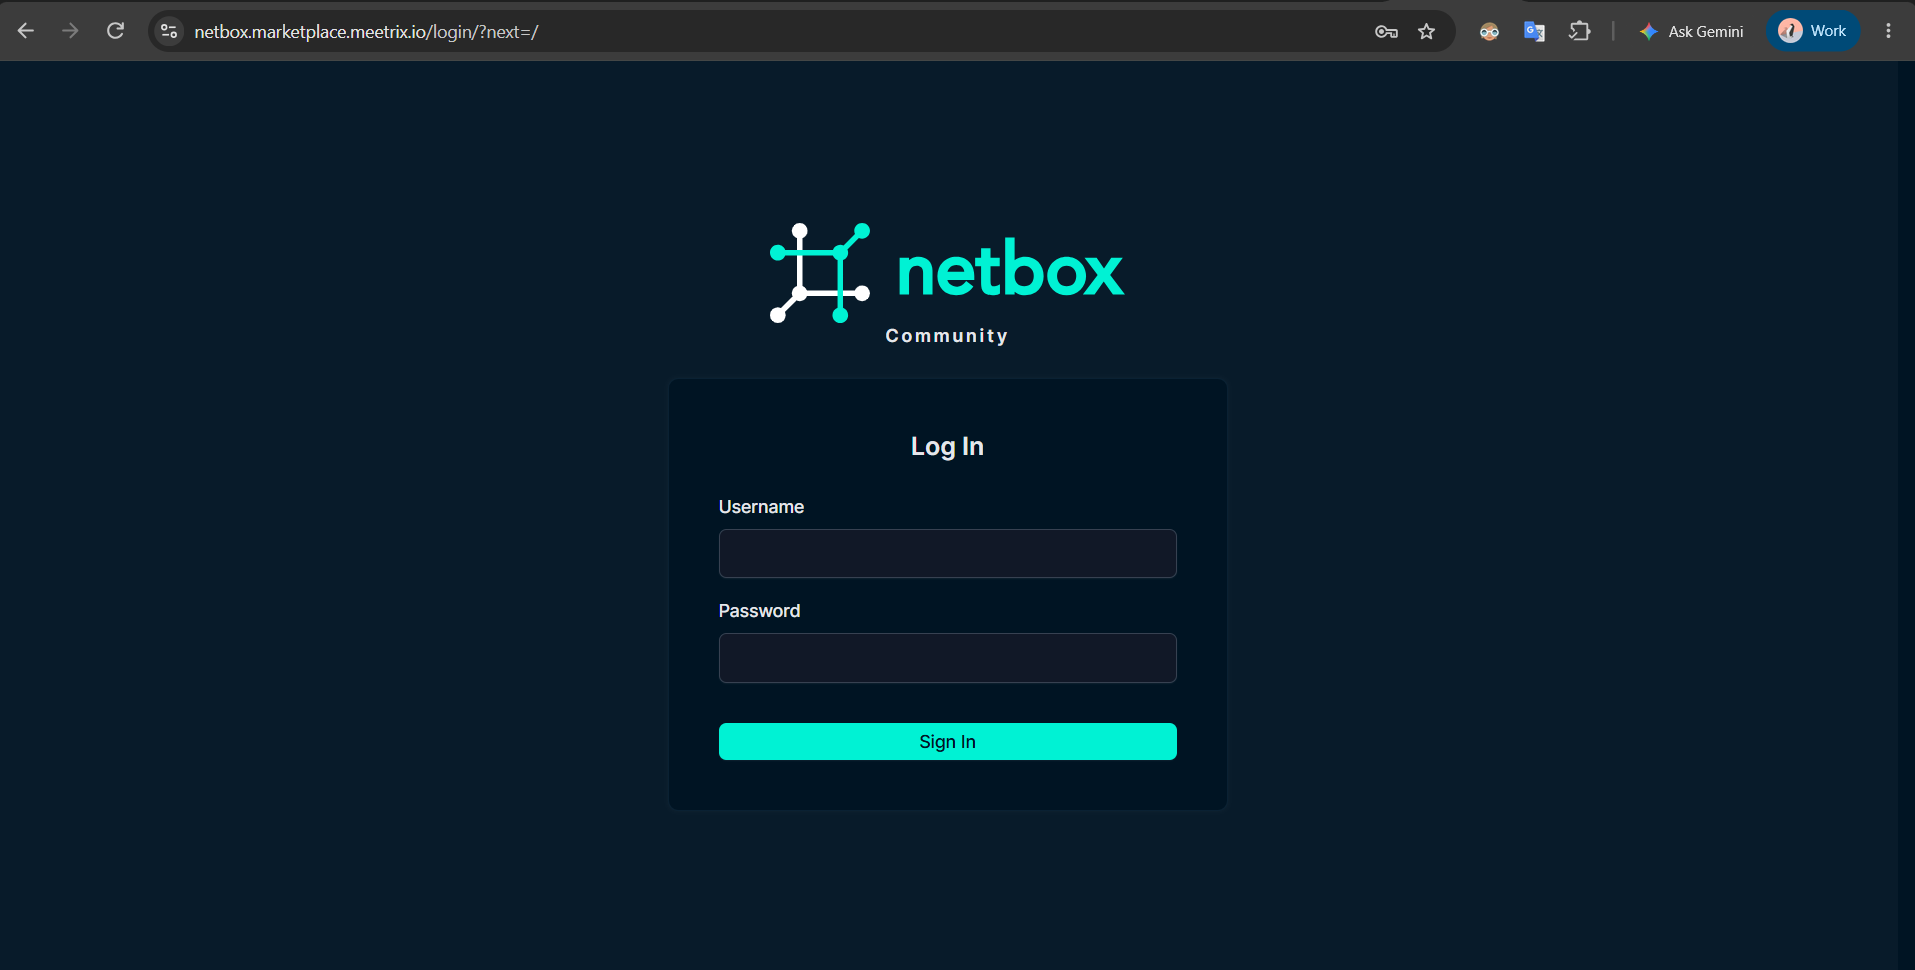
On the login page, enter the username admin and the admin password you set in the Application Settings, then click Sign In.
502 Bad Gateway Error?
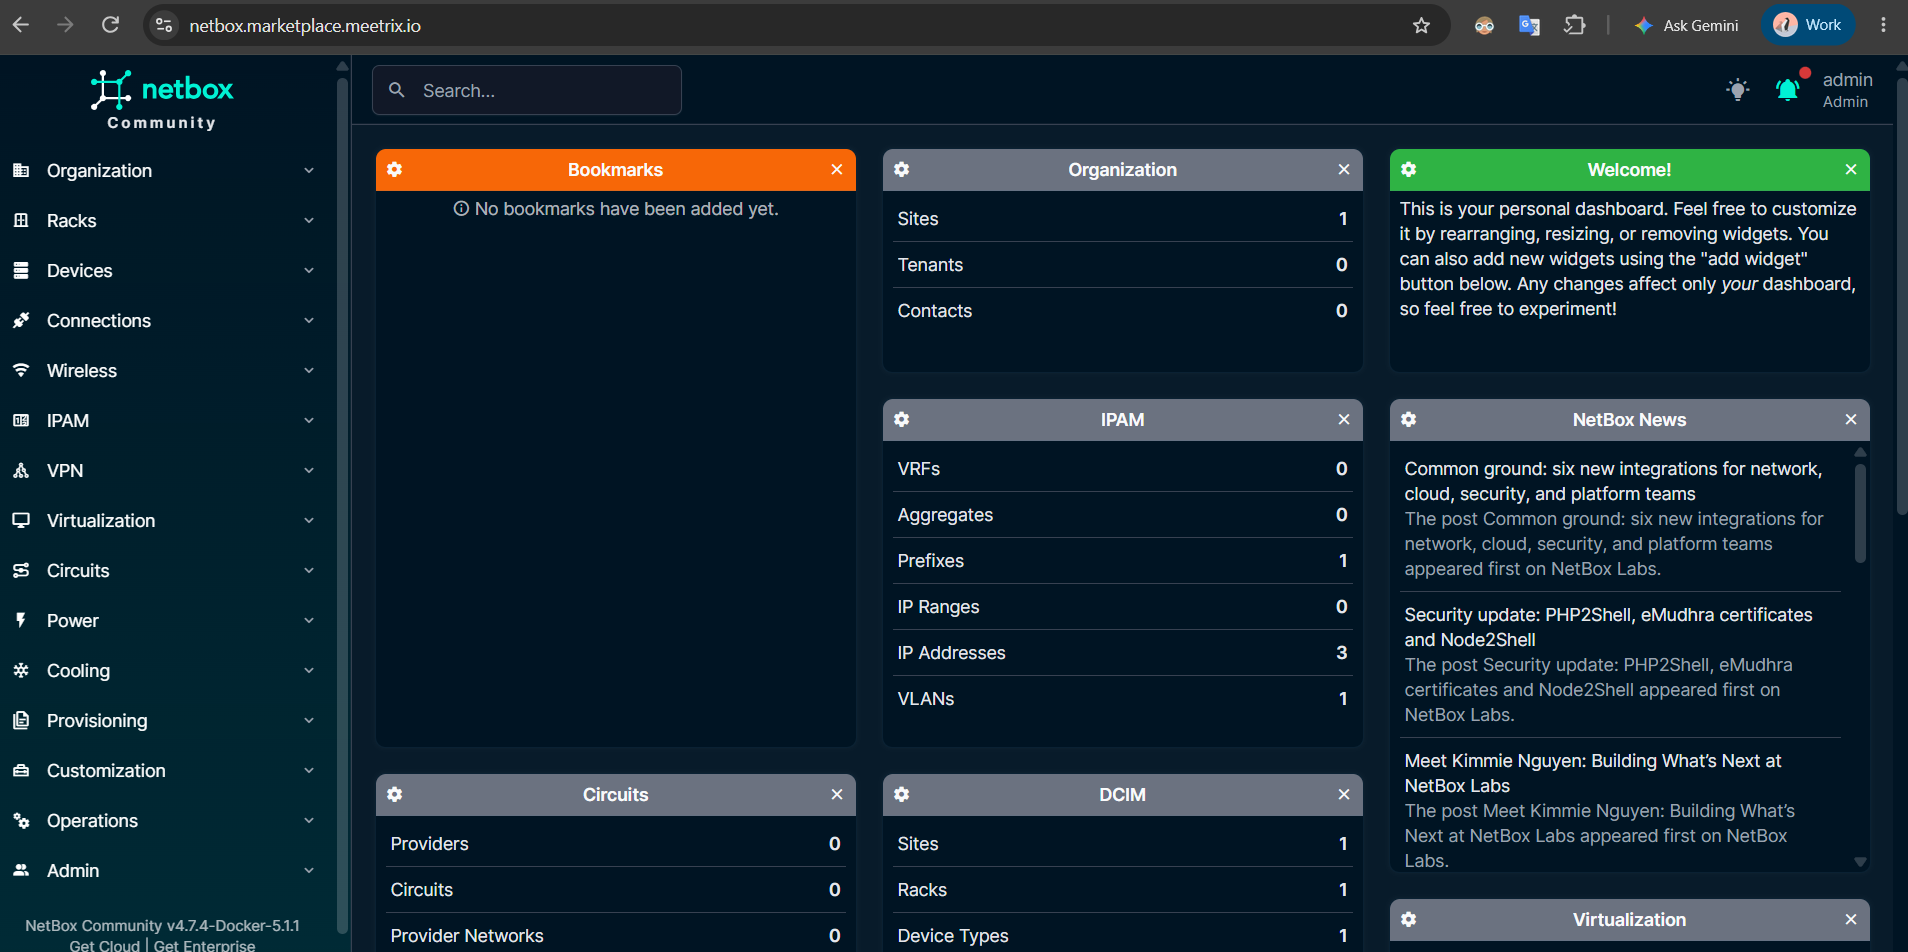
After signing in you land on the NetBox dashboard. The navigation on the left groups everything NetBox tracks, from Organization, Racks and Devices to IPAM, VPN, Virtualization and Circuits, and the widgets count the objects of each type. On a new deployment they all start at zero.
Admin account
Add Your First Site and Prefix
Most NetBox objects hang off a site, so start there, then record the address space it uses.
- Open Organization in the navigation, go to Sites and click Add.
- Enter a Name, such as the data center or office it represents. NetBox fills in the Slug for you. Set the Status, then click Create.
- Open IPAM, go to Prefixes and click Add.
- Enter the network in CIDR notation, such as 10.10.0.0/16, assign it to the site you just created, and click Create.
From there you can add racks to the site, then manufacturers, device types and devices, and NetBox shows which addresses in each prefix are used and which are free. The NetBox documentation describes every object in the data model and how they relate.
Create an API Token
Scripts, Ansible playbooks and other tools talk to NetBox through its REST API, and each one needs a token.
- Open Admin → API Tokens and click Add.
- Choose the user the token acts as. Leave Write enabled off unless the tool needs to change data, and set an expiry date if the token is temporary.
- Click Create and copy the full token, which starts with
nbt_, right away. NetBox does not show it again.
You can also create a token from the command line with the admin credentials. Replace the domain and password with your own:
curl -s -X POST -H "Content-Type: application/json" \
  https://<your-domain>/api/users/tokens/provision/ \
  -d '{"username":"admin","password":"<your admin password>"}'
NetBox 4.7 issues v2 tokens. Build the header from the key and token fields of the response as Bearer nbt_<key>.<token>, and test it by asking NetBox for its status:
curl -s -H "Authorization: Bearer nbt_<key>.<token>" \
  -H "Accept: application/json" \
  https://<your-domain>/api/status/
A JSON response with the NetBox and Python versions means the token works. The older Authorization: Token header is rejected with 403, so update any script written for earlier NetBox versions. You can browse the whole API at /api/ on your domain, and the interactive reference lives at /api/schema/swagger-ui/. The official REST API guide covers filtering, pagination and token formats in detail.
Generate an SSL Certificate Manually
NetBox tries to issue SSL on first boot for the domain name you provided during deployment. If that fails, for example because DNS had not propagated yet, generate it manually.
Step 1: SSH into the Server
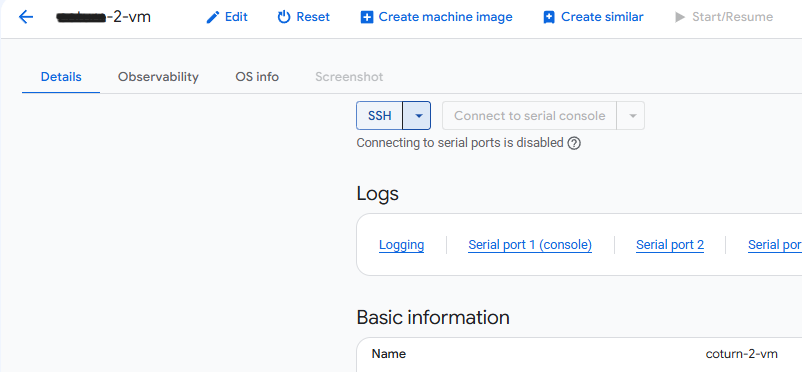
- Go to the VM instance page in the GCP console.
- Click SSH to open a browser-based terminal and authorize access.
If you prefer your own terminal, you can connect with the gcloud CLI instead, replacing the deployment name and zone:
gcloud compute ssh <deployment-name>-vm --zone=<zone>Step 2: Run the Certificate Script
The image includes a pre-configured certificate script. Run it with:
sudo bash /root/certificate_generate_standalone.shThis script runs certbot using the domain name and admin email you provided during deployment. Once it completes, switch any scripts or integrations that call the API over http to your https domain, so tokens are no longer sent in plain text.
Back Up the NetBox Database
The image backs up the NetBox database every day at 12:00 UTC. The last 7 days of dumps are always kept on the VM, and if you set a backup bucket on the deployment form, each dump is also uploaded to Cloud Storage.
| Item | Location |
|---|---|
| Schedule | Daily at 12:00 UTC |
| Cron job | /etc/cron.d/netbox-dbbackup |
| Backup script | /opt/scripts/dbbackup.sh |
| Log file | /var/log/scripts/dbbackup.log |
| Local copies | /opt/backups/dump_<date-time>.sql.gz (last 7 days) |
| Cloud Storage | gs://<backup-bucket>/netbox-dbbackup/dump_<date-time>.sql.gz |
The deployment grants the VM's service account Storage Object Creator on your bucket only, so it can upload new backups but cannot read or delete existing ones. If an upload fails, for example because the bucket was deleted, the local copy is kept and the error is written to the log file.
Check or Run the Backup
SSH into the server, then use these commands to confirm the schedule, read the result of the last runs, list the local backups, or take a backup right now, for example before an upgrade:
cat /etc/cron.d/netbox-dbbackup

sudo tail /var/log/scripts/dbbackup.log

ls -lh /opt/backups/

sudo /opt/scripts/dbbackup.sh
To change the time, edit the minute hour fields (in UTC) in /etc/cron.d/netbox-dbbackup, for example 30 2 * * * for 02:30 UTC. To keep more or fewer local copies, change RETENTION_DAYS in the backup script.
Expire Old Backups in Cloud Storage
Backups uploaded to the bucket are never deleted automatically. Add an Object Lifecycle rule to remove them after a set age. This example, run from your own machine, deletes dumps older than 30 days:
echo '{"rule":[{"action":{"type":"Delete"},"condition":{"age":30,"matchesPrefix":["netbox-dbbackup/"]}}]}' > lifecycle.json

gcloud storage buckets update gs://<backup-bucket> --lifecycle-file=lifecycle.json
Add a Bucket After Deployment
If you left the bucket empty on the form, you can add one later. On the VM, set the bucket name in the backup script:
sudo sed -i 's;^GCS_BUCKET=.*;GCS_BUCKET=<your-bucket>;' /opt/scripts/dbbackup.shThen, from your own machine, let the VM's service account upload to the bucket. By default that is the Compute Engine default service account of your project:
gcloud storage buckets add-iam-policy-binding gs://<your-bucket> \
  --member="serviceAccount:<PROJECT_NUMBER>-compute@developer.gserviceaccount.com" \
  --role="roles/storage.objectCreator"
The VM also needs read and write access to Cloud Storage in its access scopes, which it only gets at deployment when a bucket is set. Stop the VM, click Edit, set Storage to Read Write (or allow full access to all Cloud APIs) under API and identity management, save, and start it again.
Restore a Backup
To restore from Cloud Storage, download the dump on your own machine and copy it to the VM. Skip this step for a local copy in /opt/backups/.
gcloud storage cp gs://<backup-bucket>/netbox-dbbackup/<dump-file>.sql.gz .

gcloud compute scp <dump-file>.sql.gz <deployment-name>-vm:/tmp/ --zone=<zone>
On the VM, stop NetBox and its worker, load the dump, and start them again:
cd /opt/netbox && sudo docker compose stop netbox netbox-worker

gunzip -c /tmp/<dump-file>.sql.gz | sudo docker exec -i netbox-db psql -U netbox -d postgres > /tmp/restore.log 2>&1

sudo docker compose start netbox netbox-worker
Errors such as current user cannot be dropped or role "netbox" already exists in /tmp/restore.log are expected.
Images and attachments are not in the backup
netbox_netbox-media-files Docker volume. If you use them, back up that volume separately, or take a snapshot of the boot disk from the Compute Engine console.
Check NetBox Server Logs
SSH into the server as shown above. NetBox runs as five Docker containers: netbox-app (the web interface and API), netbox-worker (background jobs and webhooks), netbox-db (PostgreSQL), and netbox-redis and netbox-redis-cache (Valkey). List them and follow the logs of the one you need:
sudo docker ps

sudo docker logs -f netbox-app

sudo docker logs -f netbox-worker
The stack lives in /opt/netbox: docker-compose.yml and docker-compose.override.yml define the containers, .env holds the NetBox image version, env/ holds the NetBox settings and the passwords generated for your deployment on first boot, and configuration/ holds the NetBox configuration that reads them.
The first-boot setup runs as a Compute Engine startup script. If you cannot sign in as admin, check its output for errors:
sudo journalctl -u google-startup-scripts.service | grep -i netboxManage Your NetBox Deployment on GCP
Shut Down the VM
To stop the VM without deleting it, go to Compute Engine → VM Instances in the GCP console, select your instance, and click Stop. You can restart it later by clicking Start/Resume, and NetBox starts again on its own.
Note
Delete the Deployment
To fully remove the deployment and stop all billing:
- Go to Solution deployments in the GCP console.
- Find your NetBox deployment.
- Click Delete to remove the VM, its disk, the firewall rules and the bucket permission the deployment created.
Deleting the disk also deletes the local backups in /opt/backups. Dumps already uploaded to your bucket stay there, because the bucket is yours and not part of the deployment.
Upgrades
When there is an upgrade, we update the product with a newer version. You can check the product version in GCP Marketplace. If a newer version is available, take a backup, deploy the product again using the newer version, and restore the backup into it as shown above.
To update NetBox in place on an existing VM instead, take a backup first, set VERSION in /opt/netbox/.env to a newer NetBox image tag, then pull the new images and restart. NetBox applies its database migrations automatically on start. Check the NetBox release notes before you upgrade.
sudo /opt/scripts/dbbackup.sh

sudo nano /opt/netbox/.env

cd /opt/netbox && sudo docker compose pull && sudo docker compose up -d
Troubleshoot NetBox on GCP
502 Bad Gateway
If you see a 502 Bad Gateway error when accessing your domain, NetBox is still starting up. Wait 5-10 minutes and try again. If it persists, check the container status and logs as shown above.
Deployment Fails With a 403 Error on the Bucket
If the deployment fails while setting the backup bucket permission, the deployment service account does not have Storage Admin. Deploy again with New account selected, or add the Storage Admin role to your existing account first. Also check that the bucket name is spelled correctly and that the bucket already exists.
Backups Are Not Reaching the Bucket
Run sudo tail /var/log/scripts/dbbackup.log on the VM. An upload error usually means the bucket was deleted or renamed, or the VM's service account lost its Storage Object Creator role on it. The local copies in /opt/backups are kept either way.
Cannot Sign In as Admin
Check that you are using the username admin and the password from the deployment form. To set a new admin password, SSH into the server and run:
cd /opt/netbox && sudo docker compose exec netbox /opt/netbox/venv/bin/python /opt/netbox/netbox/manage.py changepassword adminAPI Returns 403 Forbidden
If API calls return 403 Forbidden, check that the request sends Authorization: Bearer followed by the full nbt_ token, not the older Token header, that the token has not expired, and that it has write access for requests that change data.
SSL Did Not Issue
Confirm your DNS A record points at the VM's current external IP and has propagated, then re-run the certificate script from Generate an SSL Certificate Manually.
Storage Full Error
Uploaded attachments and local backups grow over time. SSH into the server and run:
df -hIf the root volume is between 90-100%, resize the boot disk from the Compute Engine console, then reboot the instance.
Conclusion
You now have NetBox running in your own GCP project, with SSL, your own domain, an API your automation can read from, and a daily database backup that can live outside the VM. From here, model your sites, racks and devices, record your prefixes and VLANs, and give each tool its own API token. NetBox records what your network should look like; if you manage Kubernetes clusters on that network, our Rancher on GCP developer guide sets up a management server on the same cloud, and the Apache Guacamole on GCP developer guide gives your team browser-based SSH and RDP access to the machines NetBox documents.
Technical Support
If you run into any issues, our support team is here to help. Reach out to us at support@meetrix.io and we will respond within 12 hours.
Frequently Asked Questions
What is NetBox?
NetBox is an open-source source of truth for network infrastructure. It combines IP address management (IPAM) and data center infrastructure management (DCIM), so sites, racks, devices, cables, circuits, prefixes, IP addresses, VLANs and VRFs are documented in one place, with a REST API and a GraphQL API for automation.
How do I log in to NetBox on GCP?
Open your domain, or the admin_url from the deployment outputs before SSL is in place, and sign in with the username admin and the admin password you set in the Application Settings section of the deployment form. The admin account is a superuser, so create separate accounts for the rest of your team.
Which machine type should I choose for NetBox?
e2-medium (2 vCPU, 4 GB RAM) is the default and the minimum the deployment form accepts. It runs the full stack of NetBox, its background worker, PostgreSQL and two Valkey instances comfortably for small and medium networks. Move to e2-standard-2 or larger for large inventories or heavy API automation.
How is the NetBox database backed up on GCP?
The database is dumped every day at 12:00 UTC to /opt/backups on the VM, and the last 7 days of dumps are kept there. If you set a backup bucket on the deployment form, each dump is also uploaded to gs://your-bucket/netbox-dbbackup/. Uploaded images and attachments live in a separate Docker volume and are not part of this backup.
Why does the NetBox API return 403 Forbidden with my token?
NetBox 4.7 issues v2 tokens, which must be sent as Authorization: Bearer nbt_ followed by the token's key, a dot and the token. The older Authorization: Token header is rejected with 403. Also check that the token has not expired and that it has write access for requests that change data.
Can I use NetBox with Ansible and other automation tools?
Yes. NetBox exposes a REST API and a GraphQL API, and the netbox.netbox Ansible collection can use NetBox as a dynamic inventory or create and update NetBox objects from a playbook. Create an API token for each tool, with write access only where the tool needs it.
How do I upgrade NetBox on GCP?
Back up the database first. To update in place, set VERSION in /opt/netbox/.env to a newer NetBox image tag, then run sudo docker compose pull and sudo docker compose up -d in /opt/netbox. NetBox applies its database migrations on start. You can also deploy the newer version from GCP Marketplace and restore your backup into it.
Deploy NetBox on GCP in Minutes
Launch a pre-configured NetBox server in your own Google Cloud project with a Meetrix image, and keep your network's source of truth on infrastructure you control.
Get Started on GCP Marketplace