Learn how to deploy LocalAI on AWS with our step-by-step guide. It walks you through choosing a CPU or GPU instance, launching the Meetrix LocalAI AMI with CloudFormation, pointing your domain at it, signing in with your API key, installing models, calling the API from your code, and keeping the server healthy once it runs.
LocalAI is an open-source runtime that runs language, image and audio models on your own hardware and serves them through an OpenAI-compatible API. Tools and SDKs built for the OpenAI API work against it by changing the base URL, which is the same idea behind our guide to running a self-hosted OpenAI-compatible API on AWS. The Meetrix image runs LocalAI 4.11.0 in Docker on Ubuntu 26.04, protects both the web UI and the API with an API key, and comes with the qwen3-4b-instruct model ready to use.
Prerequisites
Before you get started with the LocalAI AMI, ensure you have the following prerequisites:
- Basic knowledge of AWS services, including EC2 instances and CloudFormation.
- An active AWS account with appropriate permissions.
- An EC2 key pair in the region you will deploy to.
- For a GPU deployment, enough "Running On-Demand G and VT instances" vCPU quota to launch a g4dn instance.
- If you encounter a vCPU quota error when launching the stack, follow https://meetrix.io/blogs/increase-aws-vcpu-quota/ to increase your vCPU limit.
Choose CPU or GPU
The same LocalAI image runs on both CPU and GPU instances, and you choose between them with the InstanceType stack parameter. On a GPU instance LocalAI uses the NVIDIA GPU; on a CPU instance it falls back to its CPU backends.
| CPU | GPU | |
|---|---|---|
| Recommended instance | t3a.xlarge | g4dn.xlarge |
| Hardware | 4 vCPUs, 16 GB RAM | 4 vCPUs, 16 GB RAM, one NVIDIA T4 with 16 GB of GPU memory |
| Good for | Trying LocalAI, small chat models, embeddings, low-traffic internal tools | Faster responses, 7B to 8B chat models, image generation and speech |
| vCPU quota | Standard On-Demand instances | On-Demand G and VT instances, which is often 0 in new accounts |
Start on a CPU instance if you only want to evaluate LocalAI or run small models, and move to a GPU when response times matter. Our breakdown of GPU costs for LLM inference on AWS and GCP helps you estimate what a GPU instance will cost each month.
Launching the AMI
Step 1: Find and Select LocalAI AMI
- Log in to your AWS Management Console.
- Navigate to 'LocalAI' in AWS Marketplace.
Step 2: Initial Setup & Configuration
- Click the "Continue to Subscribe" button.
- After subscribing, accept the terms and click "Accept Terms".
- Wait a few minutes until processing completes, then click "Continue to Configuration".
- Select "CloudFormation script to deploy LocalAI" as the fulfillment option and choose your region. Click "Continue to Launch".
- From the "Choose Action" dropdown, select "Launch CloudFormation" and click "Launch".
Create CloudFormation Stack
Step 1: Create a stack
- Ensure the "Template is ready" option is selected under "Prepare template".
- Click "Next".
Step 2: Specify stack options
- Provide a unique "Stack name".
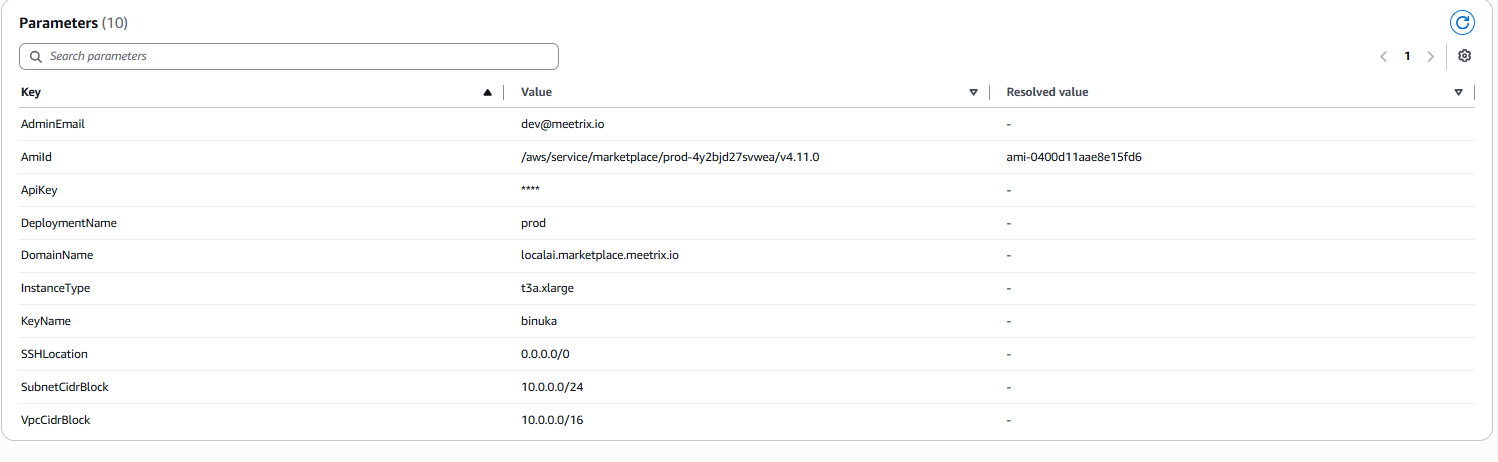
- Enter the "AdminEmail" used for SSL certificate generation.
- Enter an "ApiKey". You sign in to the LocalAI web UI with this key, and every API request sends it as a bearer token, so use a long random value and store it securely.
- Enter a value for "DeploymentName".
- Provide a public domain for "DomainName". LocalAI will automatically try to set up SSL if the domain is hosted on Route 53. If unsuccessful, you must set up SSL manually.
- Choose an instance type "InstanceType" (Recommended: t3a.xlarge for CPU or g4dn.xlarge for GPU).
- Select your preferred "KeyName".
- Set "SSHLocation" to 0.0.0.0/0, or restrict it to your own IP range.
- Keep "SubnetCidrBlock" as 10.0.0.0/24.
- Keep "VpcCidrBlock" as 10.0.0.0/16.
- Click "Next".
Step 3: Configure stack options
- Choose "Roll back all stack resources" and "Delete all newly created resources" under "Stack failure options".
- Click "Next".
Step 4: Review
Review and verify the parameters you've entered.
- Tick "I acknowledge that AWS CloudFormation might create IAM resources with custom names".
- Click "Submit".

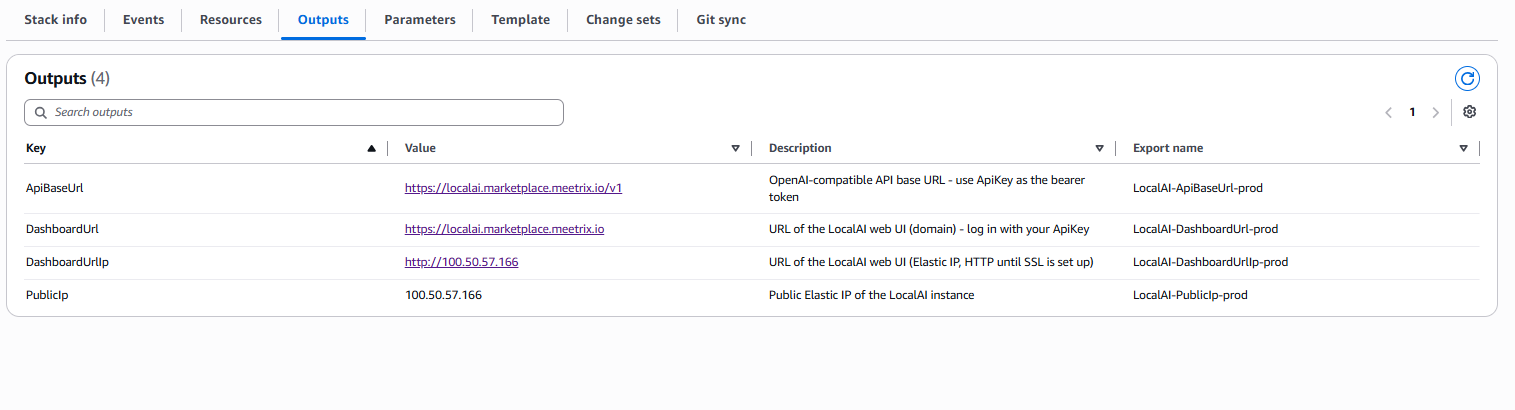
Afterward, you'll be directed to the CloudFormation stacks page. Please wait 5-10 minutes until the stack status shows CREATE_COMPLETE. The "Outputs" tab then lists the API base URL, the web UI URLs and the public IP.
Update DNS
Step 1: Copy IP Address
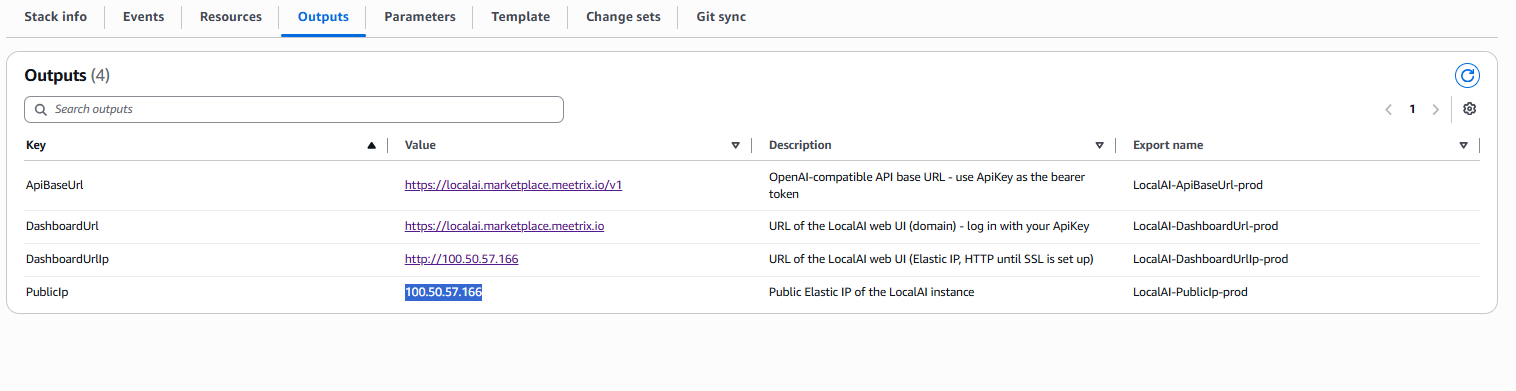
Copy the public IP labeled "PublicIp" in the "Outputs" tab.
Step 2: Update DNS
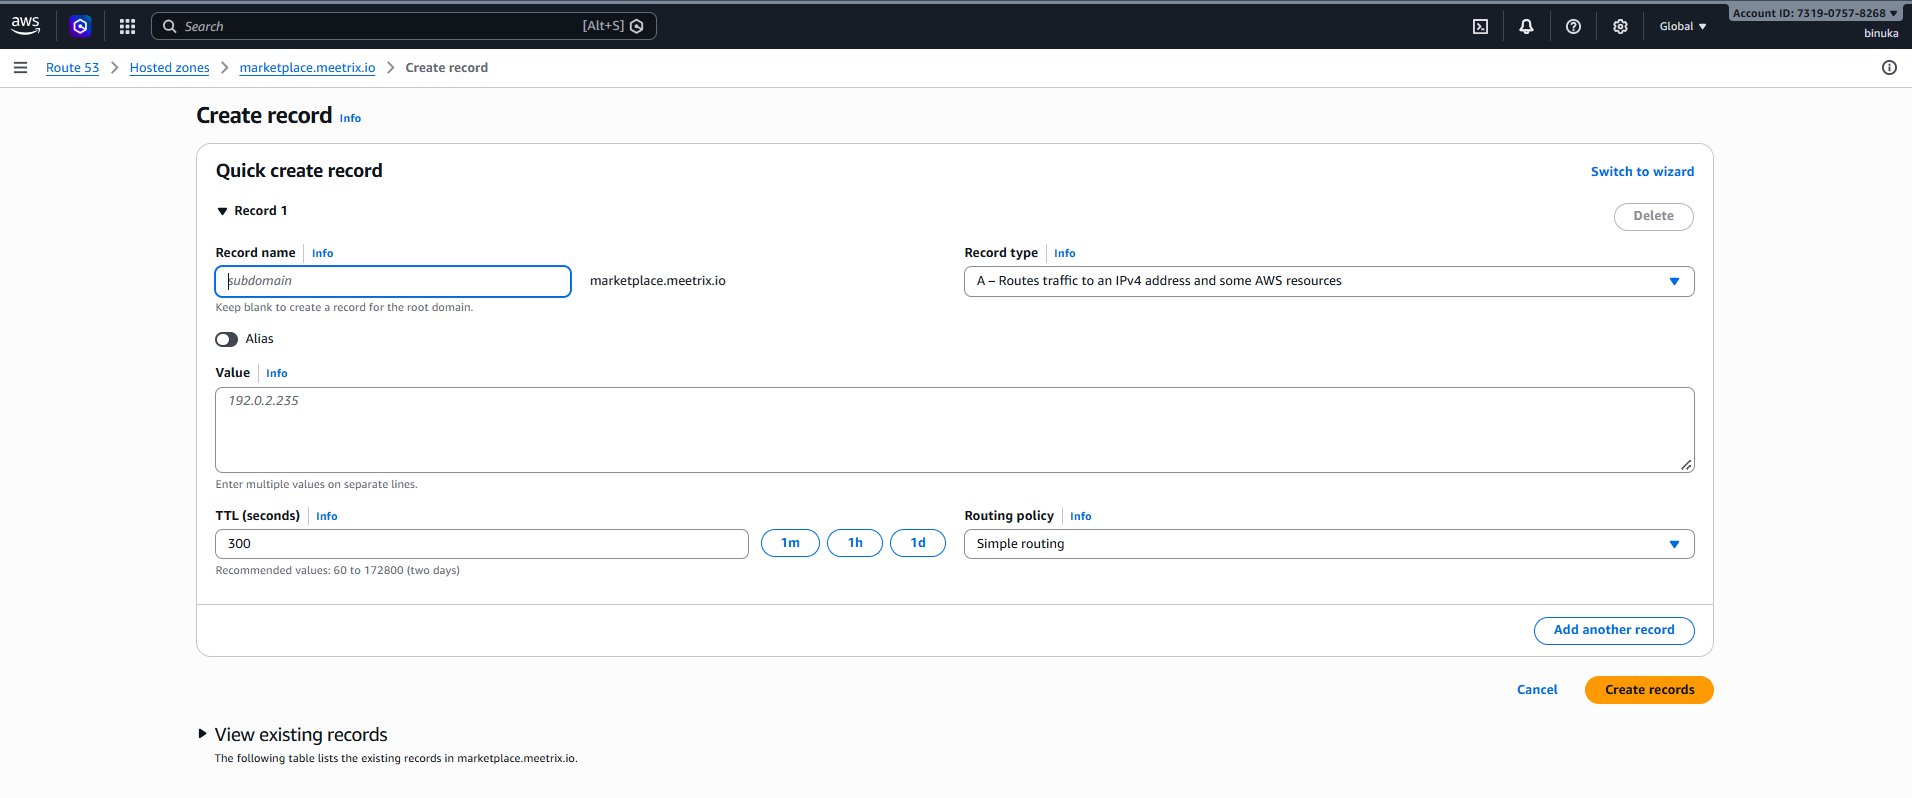
- Go to AWS Route 53 and navigate to "Hosted Zones".
- Click Create record.
- Add a record name matching the DomainName you entered, keep the record type as A, and paste the copied PublicIp into the value textbox.
- Click "Create records".
Access LocalAI
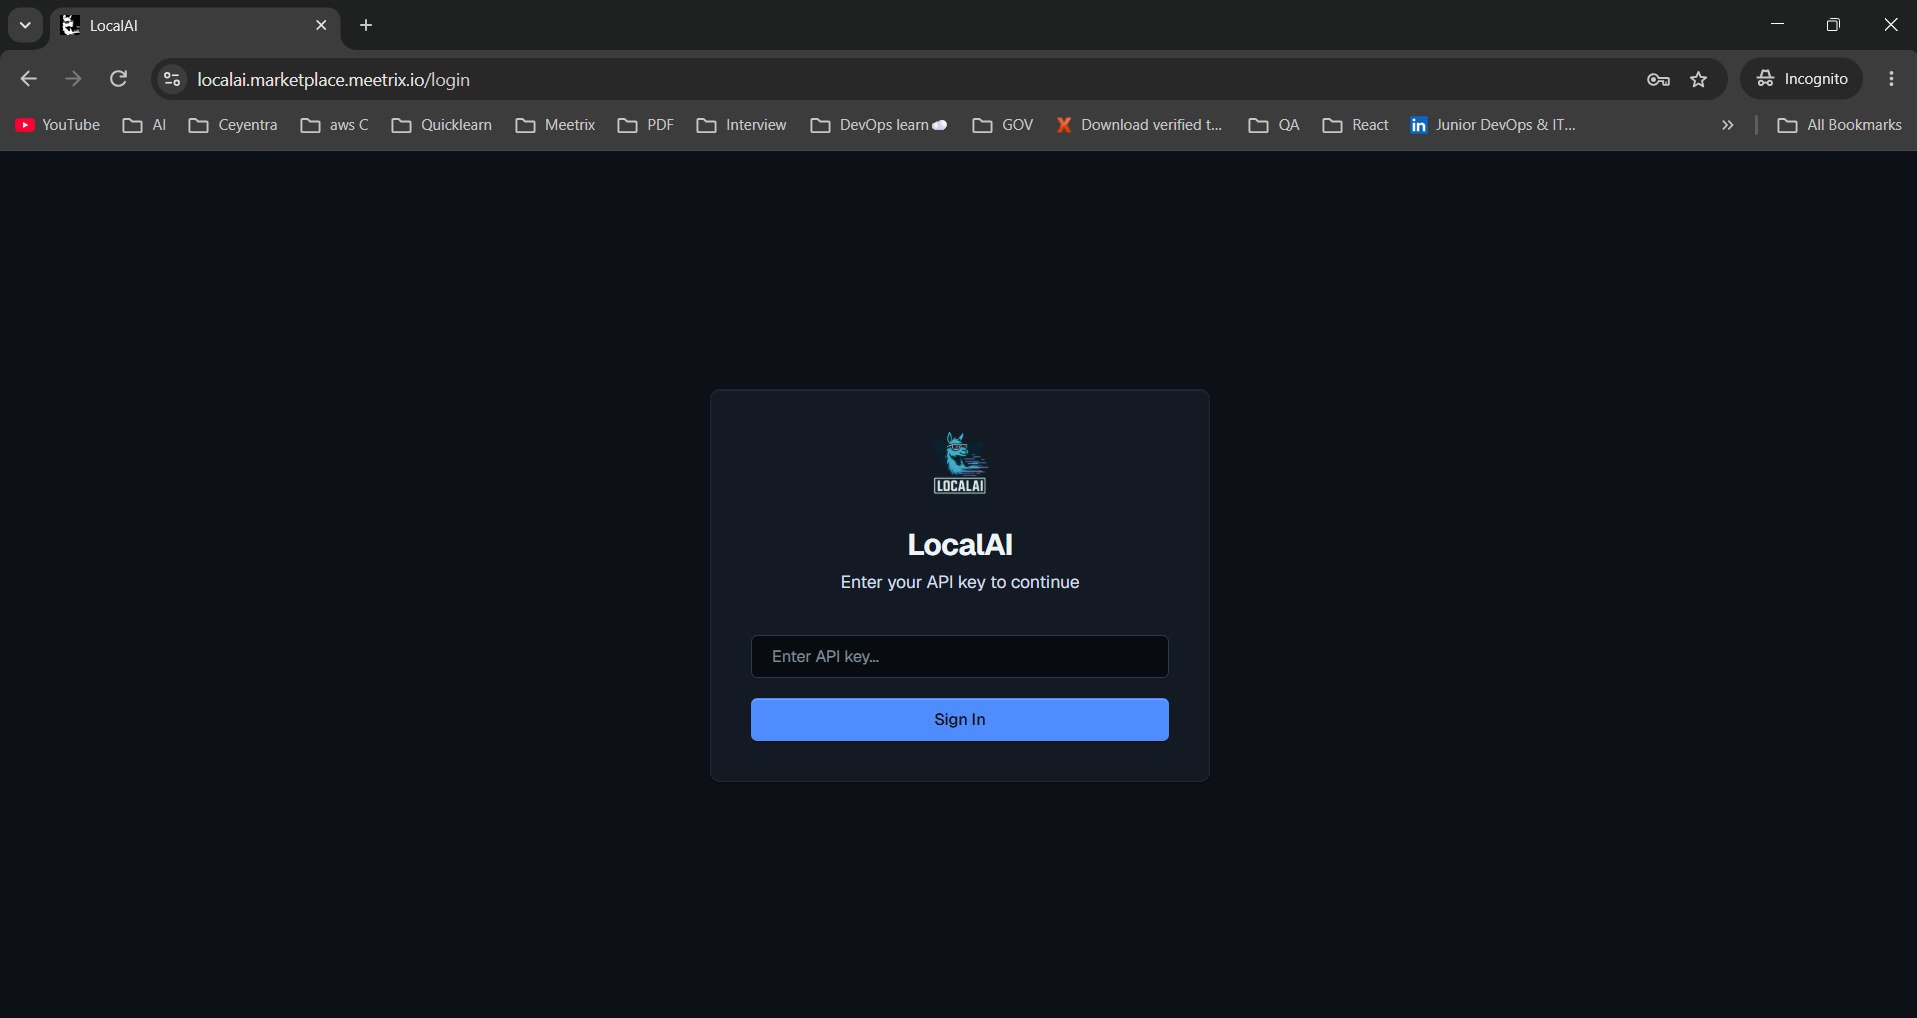
Access LocalAI using the "DashboardUrl" in the Outputs tab. Until DNS and SSL are in place you can use "DashboardUrlIp" instead, which serves LocalAI over plain HTTP.
Note
On the sign-in page, enter the ApiKey you set in the stack parameters and click "Sign In".
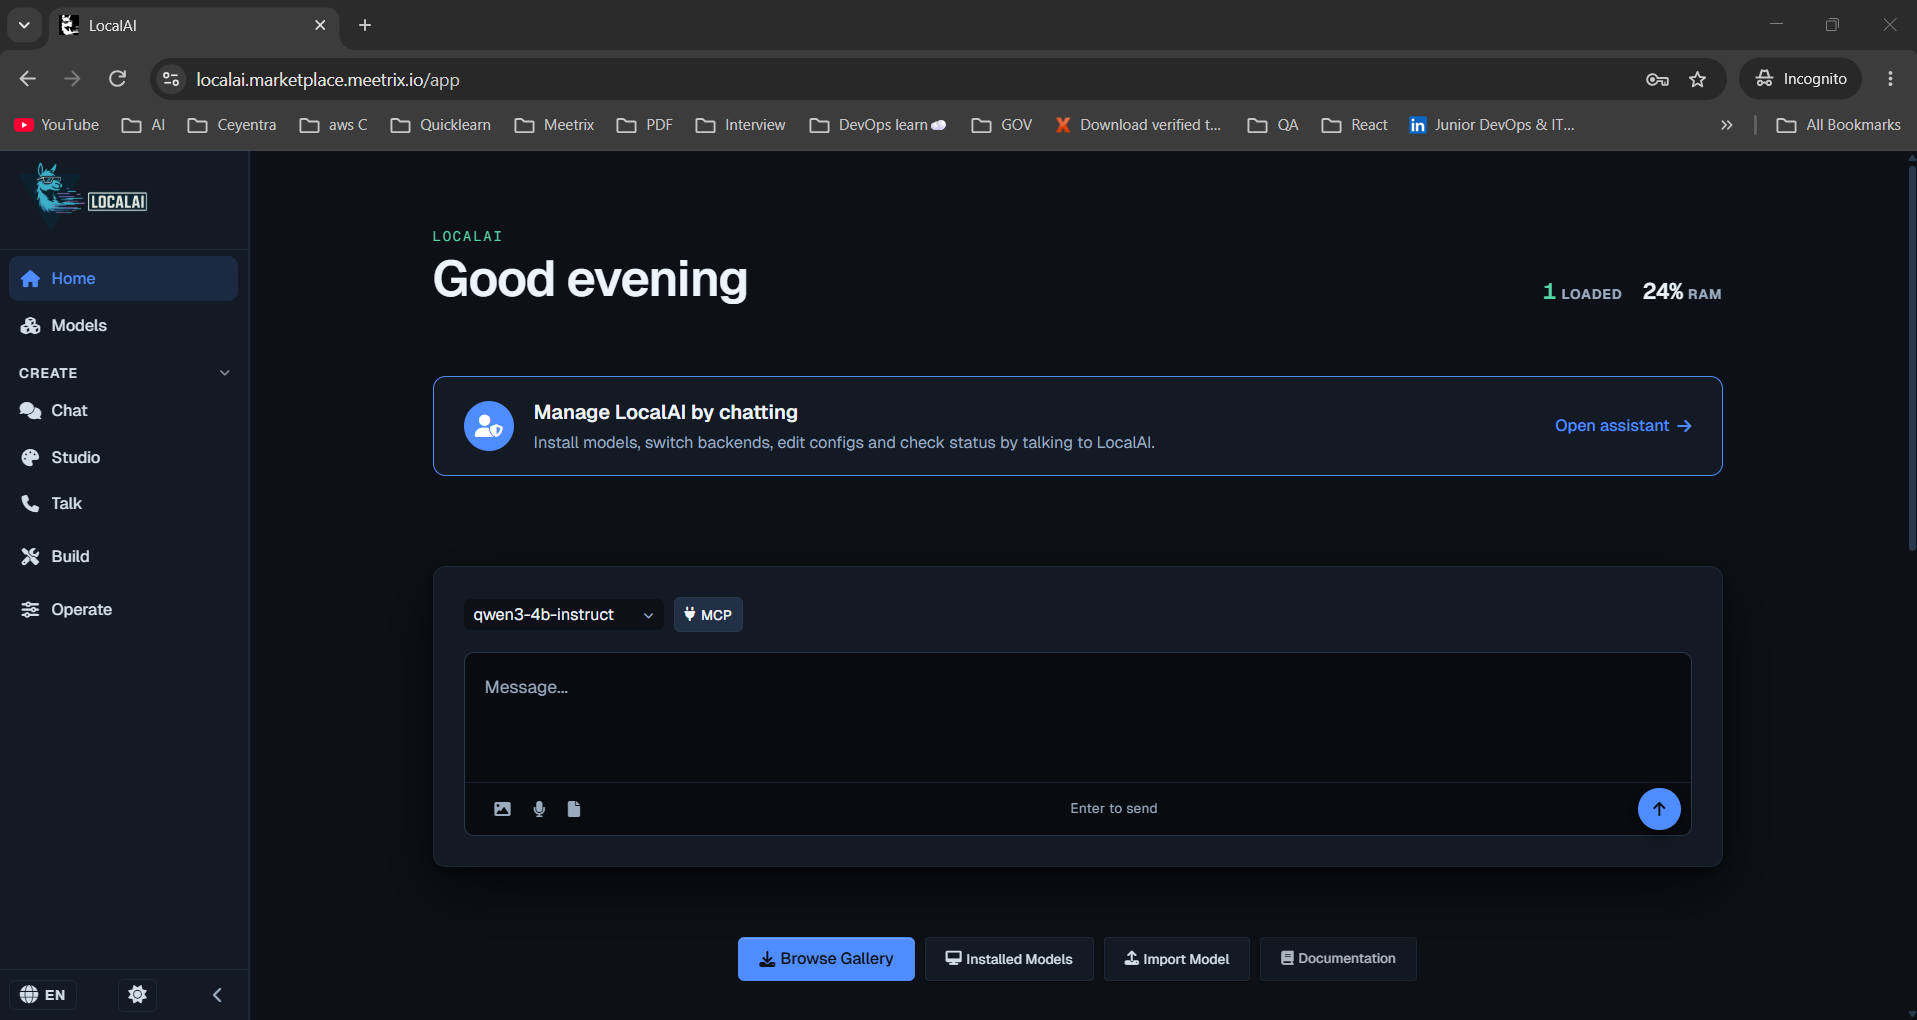
After signing in you land on the LocalAI home page. The pre-installed qwen3-4b-instruct model is already selected in the chat box, so you can type a message and get a reply straight away. The counters in the top-right corner show how many models are loaded and how much of the instance's RAM they use. The menu on the left opens Models, the Chat, Studio and Talk tools, Build for importing your own models, and Operate for activity and system status.
API key
Install More Models
LocalAI installs models from its gallery, which covers chat models, embedding models, image generators, and speech models.
- Click "Browse Gallery" on the home page, or open Models in the menu.
- Search for a model by name or filter by type, then click "Install".
- Follow the download progress at the top of the page, or under Operate. Once it finishes, the model appears in the model dropdown in Chat.
Pick models that fit your instance. On t3a.xlarge, stay with small quantized models of a few billion parameters. On g4dn.xlarge, the T4's 16 GB of GPU memory fits quantized 7B to 8B chat models. If you are not sure which open model to start with, our roundup of the best open-source LLMs to self-host compares the main families. The LocalAI models documentation also covers importing models straight from Hugging Face.
Call the LocalAI API
Use the "ApiBaseUrl" from the Outputs tab, which is your domain followed by /v1, and send your ApiKey in the Authorization header. Replace the domain and key with your own and list the installed models:
curl https://<your LocalAI domain>/v1/models \
  -H "Authorization: Bearer <your ApiKey>"
Then send a chat completion request to the pre-installed model:
curl https://<your LocalAI domain>/v1/chat/completions \
  -H "Content-Type: application/json" \
  -H "Authorization: Bearer <your ApiKey>" \
  -d '{
    "model": "qwen3-4b-instruct",
    "messages": [{"role": "user", "content": "Say hello in one sentence."}]
  }'
Because the API is OpenAI-compatible, the official OpenAI SDKs work by changing the base URL. In Python:
from openai import OpenAI

client = OpenAI(
    base_url="https://<your LocalAI domain>/v1",
    api_key="<your ApiKey>",
)

response = client.chat.completions.create(
    model="qwen3-4b-instruct",
    messages=[{"role": "user", "content": "Say hello in one sentence."}],
)
print(response.choices[0].message.content)
A chat front end such as the one in our Open WebUI developer guide can use LocalAI as its OpenAI-compatible backend in the same way.
Generate SSL Manually
LocalAI will automatically try to set up SSL when a Route 53-hosted domain is provided. If it fails, follow these steps to generate SSL manually.
Step 1: Copy IP Address
- Follow the Update DNS steps above, if not already done.
- Copy the Public IP indicated as "PublicIp" in the "Outputs" tab.
Step 2: Log in to the server
- Open the terminal and go to the directory where your private key is located.
- Run the following command, replacing the key name and IP address.
- Type "yes" and press Enter to confirm.
ssh -i <your key name> ubuntu@<Public IP address>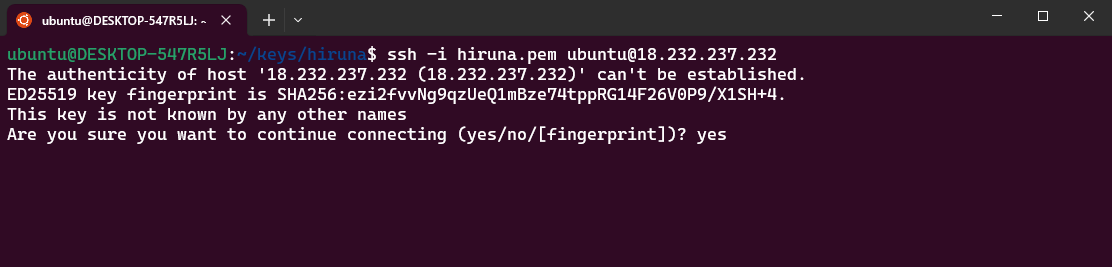
Step 3: Generate SSL
Run the following command and follow the prompts:
sudo /root/certificate_generate_standalone.shOnce the certificate is in place, switch any applications that call the API over http to the https ApiBaseUrl, so the API key is no longer sent in plain text.
Check Server Logs
Step 1: Log in to the server
ssh -i <your key name> ubuntu@<Public IP address>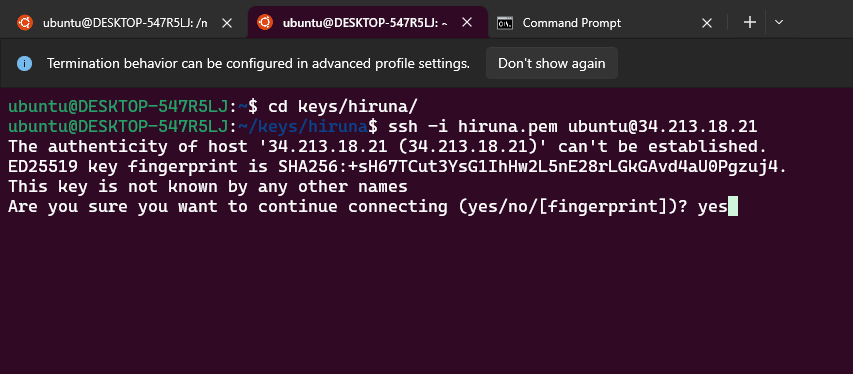
Step 2: Check the logs
List the running containers, then view the logs of the LocalAI container using the first few characters of its container ID. The logs show model downloads, backend selection and any errors when a model fails to load:
sudo docker ps

sudo docker logs <container-id-prefix>
Step 3: Check the GPU (GPU instances only)
On a g4dn instance, confirm that the T4 is visible and, while a model is answering a request, that its memory is in use:
nvidia-smiIf the GPU memory stays empty while a model runs, the model is running on the CPU. The LocalAI GPU acceleration documentation explains the gpu_layers and f16 settings that offload a model to the GPU.
Shutting Down LocalAI
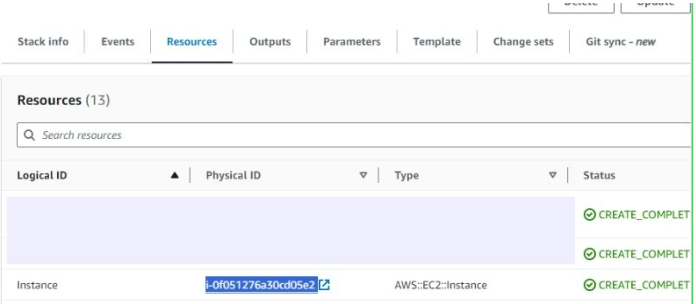
- In CloudFormation, click the link labeled "Instance" in the "Resources" tab to open the EC2 instance.
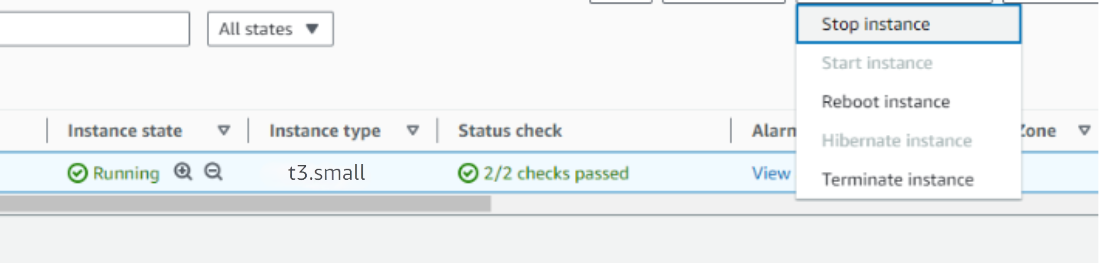
- Stop the LocalAI instance from the Instance state dropdown. You can restart it later as needed.
Note
Remove LocalAI
Delete the CloudFormation stack from the AWS Management Console under "CloudFormation Stacks" by clicking "Delete".
Upgrades
When a new version is available in AWS Marketplace, remove the previous deployment after backing up necessary server data, and relaunch with the new version.
Troubleshoot
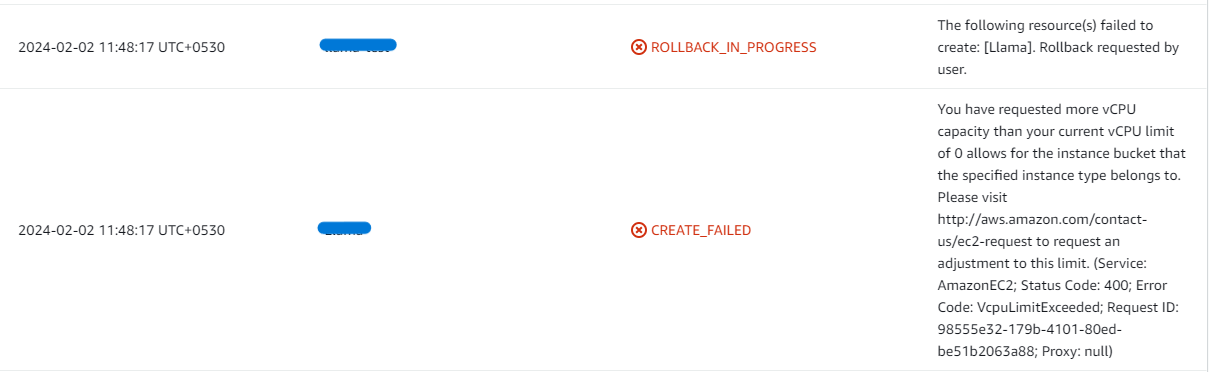
If you face vCPU quota limits, request an increase: How to increase AWS quota. GPU instances use a separate quota, "Running On-Demand G and VT instances", which you may need to raise even when your standard quota is fine.
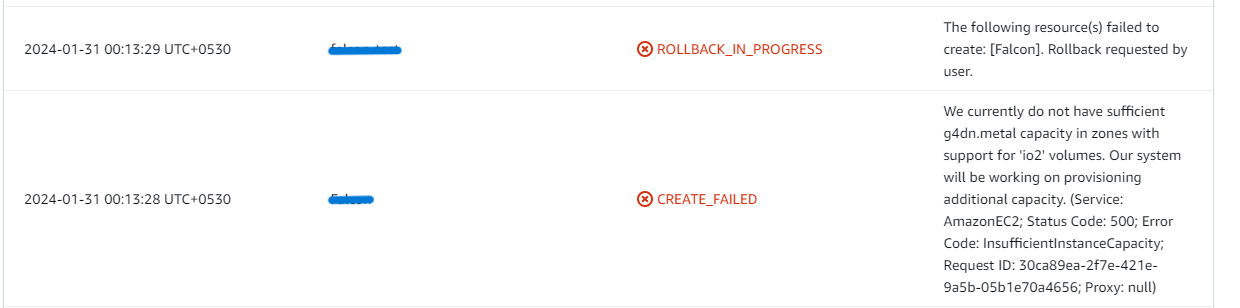
If you face insufficient capacity errors while creating the stack, try another region or time. GPU instance types run out of capacity more often than CPU types.
If LocalAI shows a 502 Bad Gateway error, wait 5-10 minutes and retry. LocalAI may still be starting up after the instance boots.

If API calls return 401 Unauthorized, check that the request sends Authorization: Bearer followed by the exact ApiKey from the stack parameters.
If a model fails to load or responses are very slow, the model is probably too large for the instance. Check the container logs, try a smaller or more heavily quantized model, or move to a GPU instance.
Check whether the instance storage is full. Models take several gigabytes each, so the disk fills up as you install more. Log into the server and run:
df -h
If the root volume is between 90-100%, delete models you no longer use from the Models page or resize the EBS volume, then reboot and restart the service.
Conclusion
The Meetrix LocalAI Deployment Guide helps you run an OpenAI-compatible AI API in your AWS environment, on CPU or GPU, with your prompts and data staying on infrastructure you control. Whether you're a developer, DevOps engineer, or IT lead, this guide provides step-by-step instructions for a secure setup. See the LocalAI store page for what the Meetrix image includes. If you need maximum throughput from a single GPU model rather than LocalAI's range of model types, our vLLM developer guide deploys a dedicated inference server on AWS, and the Ollama vs vLLM comparison explains where each engine fits. The source code and release notes are on GitHub.
Technical Support
Reach out to Meetrix Support (aws@meetrix.io) for assistance with LocalAI issues.
Frequently Asked Questions
What is LocalAI?
LocalAI is an open-source, MIT-licensed runtime for running AI models on your own hardware. It exposes an OpenAI-compatible API for text generation, embeddings, image generation, speech-to-text and text-to-speech, and ships a web UI for chatting with models and installing new ones from its gallery.
How do I log in to LocalAI?
Open the DashboardUrl from the CloudFormation Outputs tab and enter the ApiKey you set in the stack parameters. The same key is the bearer token for API requests, so store it securely and treat it like a password.
Does LocalAI need a GPU?
No. The Meetrix image runs on both CPU and GPU instances. t3a.xlarge is the recommended CPU baseline and works well for small models and embeddings. Choose g4dn.xlarge, which has an NVIDIA T4 with 16 GB of GPU memory, for faster responses, larger chat models and image generation.
Which model is installed by default?
qwen3-4b-instruct comes pre-installed, so you can chat with it as soon as you log in. Install more models from the gallery under Models in the web UI, and choose sizes that fit the memory of your instance.
Can I use the OpenAI SDK with LocalAI?
Yes. Set the SDK's base URL to the ApiBaseUrl from the Outputs tab (your domain followed by /v1), pass your ApiKey as the API key, and use the name of an installed model, such as qwen3-4b-instruct.
How do I upgrade LocalAI?
When a new version is available in AWS Marketplace, back up any models and configuration you need, remove the previous deployment, then launch a new stack with the new version.
How do I get technical support?
Reach out to Meetrix Support at aws@meetrix.io for assistance with LocalAI issues.
Ready to Deploy Your Own LocalAI?
Get started in minutes with our pre-configured AMI and run an OpenAI-compatible AI API on CPU or GPU instances you control.
Deploy LocalAI from AWS Marketplace