Welcome to the Flowise Deployment Guide for AWS! Flowise is an open-source, low-code platform that lets you build powerful LLM-powered applications through a visual drag-and-drop interface. Deploy it on AWS with the Meetrix pre-configured AMI and start building AI chatbots, agents, and LLM workflows in minutes — no complex setup required.
Prerequisites
Before you get started with the Flowise AMI, ensure you have the following prerequisites:
- Basic knowledge of AWS services, including EC2 instances and CloudFormation.
- An active AWS account with appropriate permissions.
- Enough vCPU limit to create an instance (Follow https://meetrix.io/blogs/increase-aws-vcpu-quota/ to ensure this).
- An SSH key pair created in your target AWS region.
- A registered domain name (optional but recommended for SSL setup).
Launching the AMI
Step 1: Find and Select the 'Flowise' AMI
- Log in to your AWS Management Console.
- Navigate to the Flowise product in AWS Marketplace.
Step 2: Initial Setup & Configuration
- Click the "Continue to Subscribe" button.
- Accept the terms and click "Continue to Configuration".
Step 3: Launching the Instance
- Click "Continue to Launch". You will be presented with two service options:
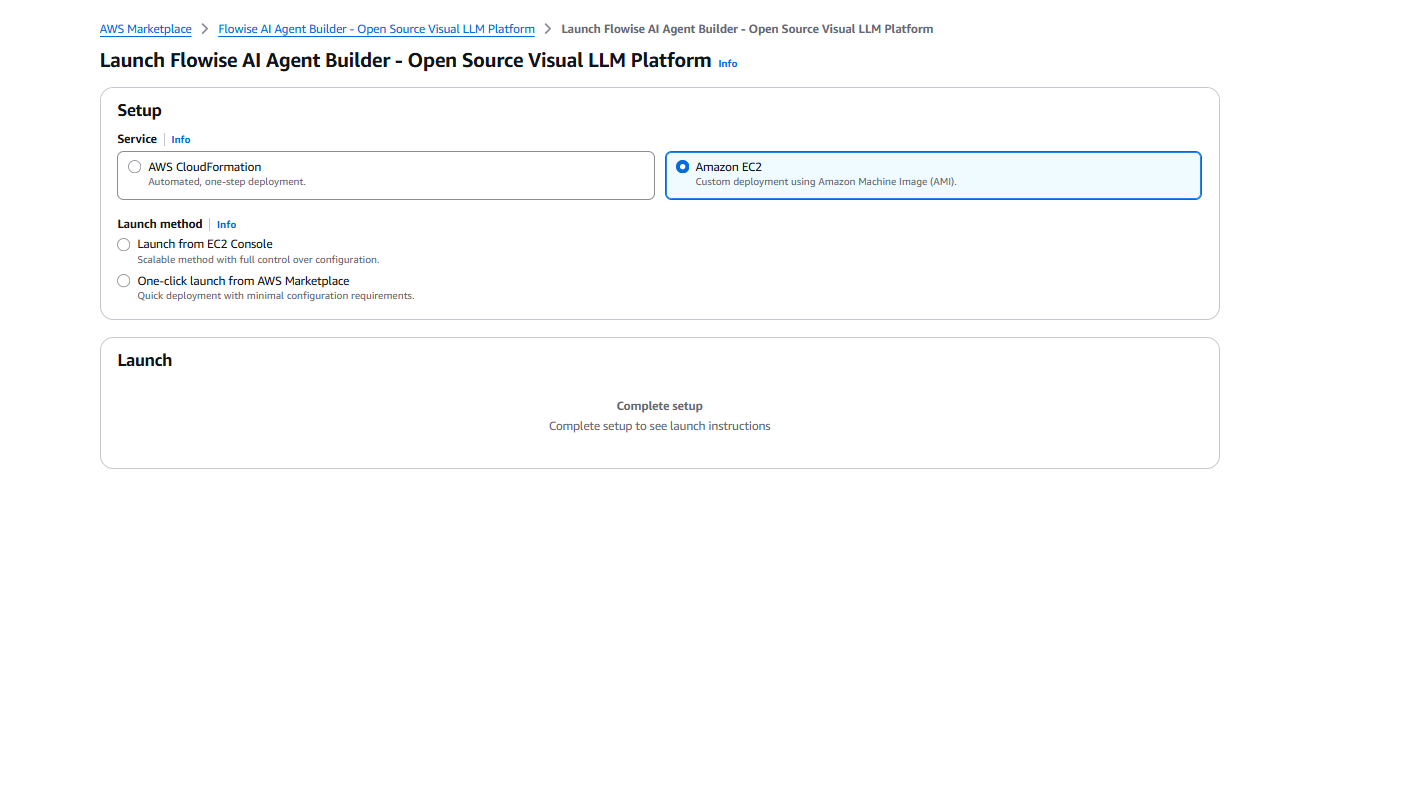
- AWS CloudFormation — Automated, one-step deployment. (Recommended — this guide follows this path.)
- Amazon EC2 — Custom deployment using Amazon Machine Image (AMI).
If you select "Amazon EC2", two additional launch methods appear:
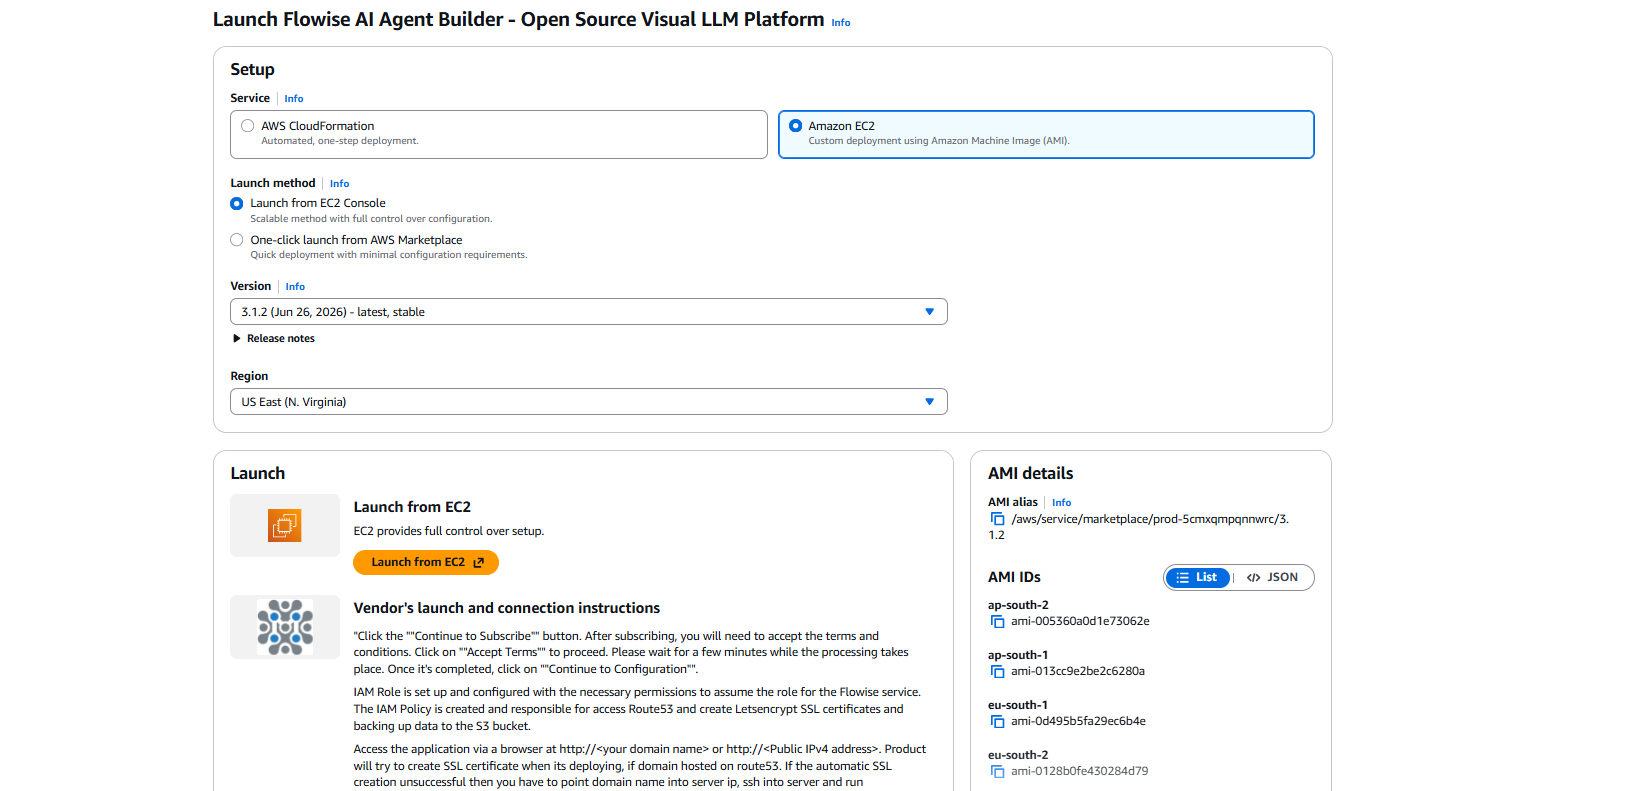
- Launch from EC2 Console — Scalable method with full control over configuration. Selecting this reveals the AMI details panel and a "Launch from EC2" button. Click it to be taken to the EC2 launch wizard.
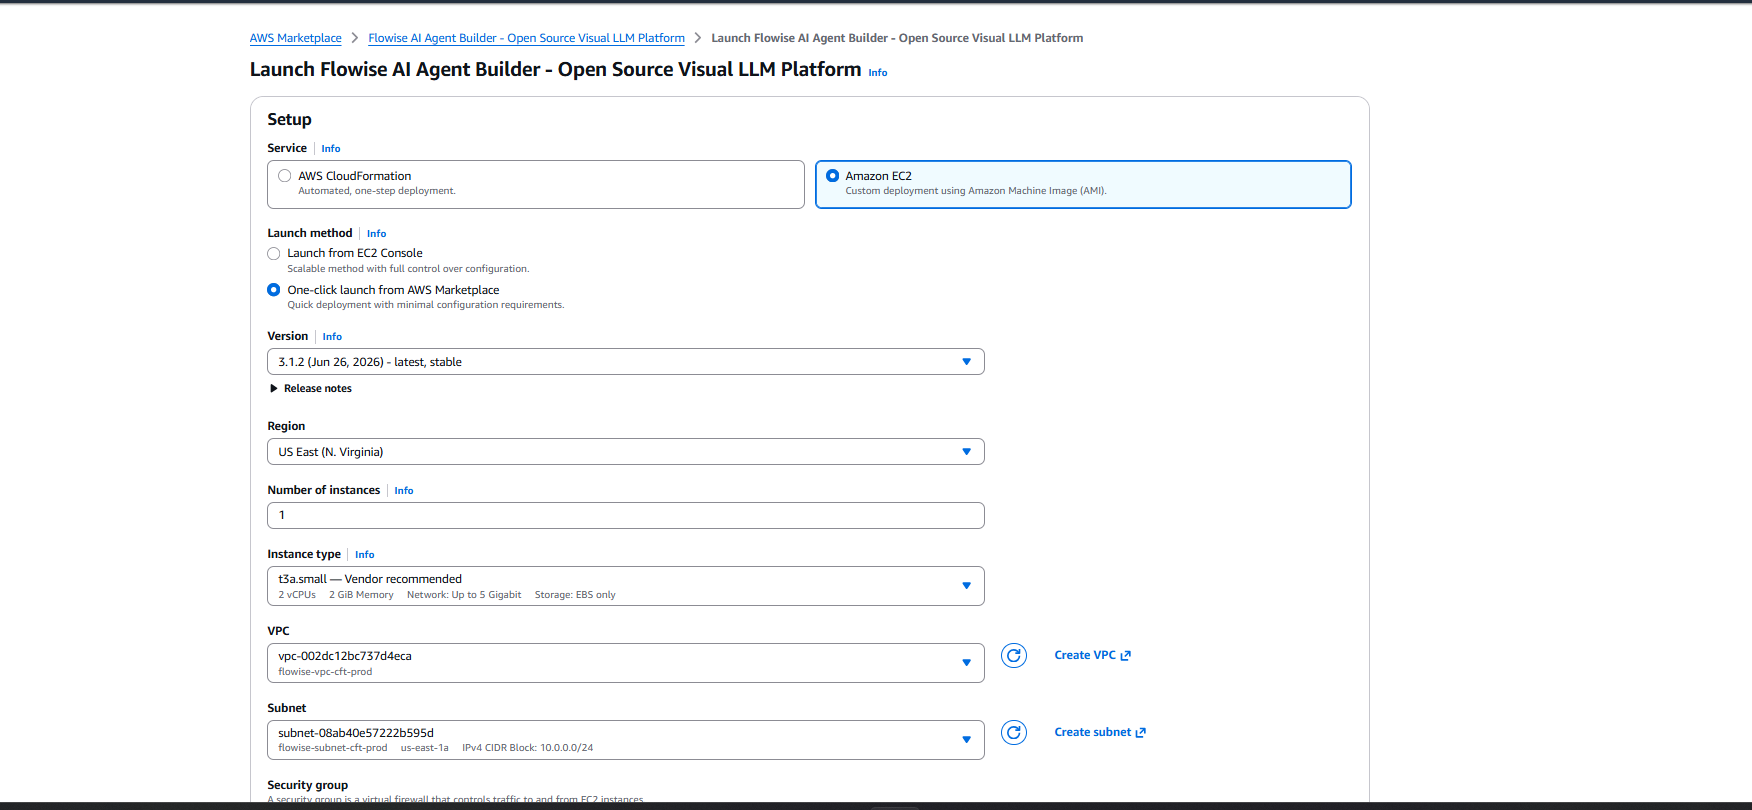
- One-click launch from AWS Marketplace — Quick deployment with minimal configuration. Selecting this reveals a configuration form where you set the region, number of instances, instance type (default: t3a.small), VPC, subnet, security group, and key pair.
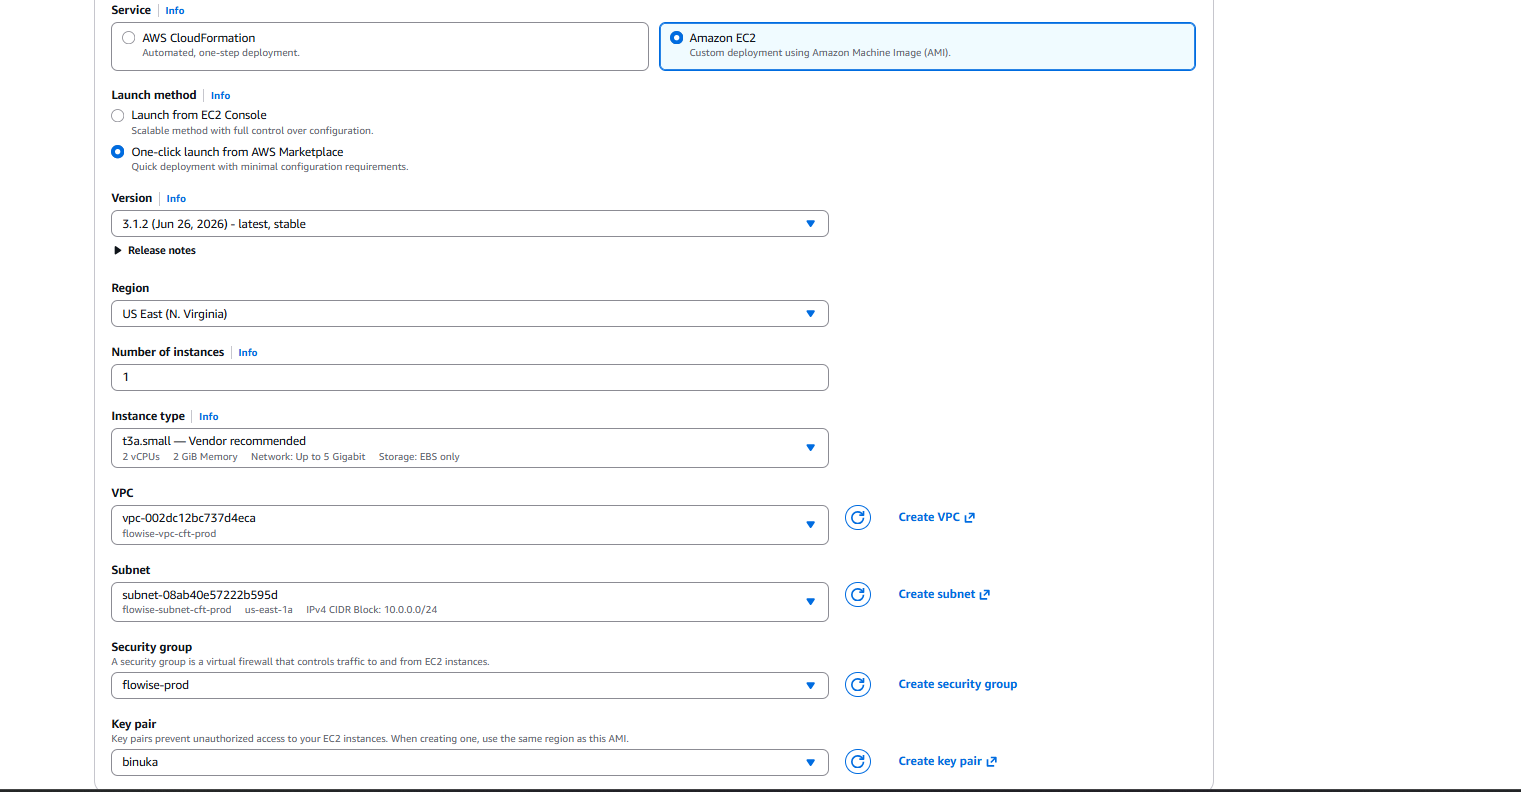
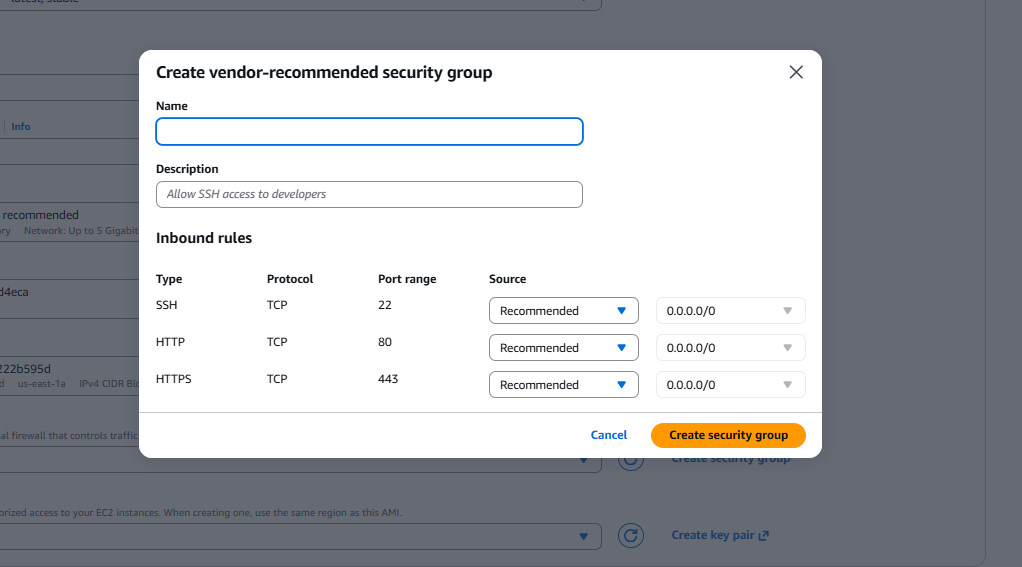
For the security group, click "Create security group" to auto-generate a vendor-recommended group with the required inbound rules: SSH (TCP/22), HTTP (TCP/80), and HTTPS (TCP/443).
This guide follows the AWS CloudFormation path. Select "AWS CloudFormation" and click "Launch" to continue.
Create CloudFormation Stack
Step 1: Create Stack
- Ensure the "Template is ready" option is selected under "Prepare template".
- Click "Next".
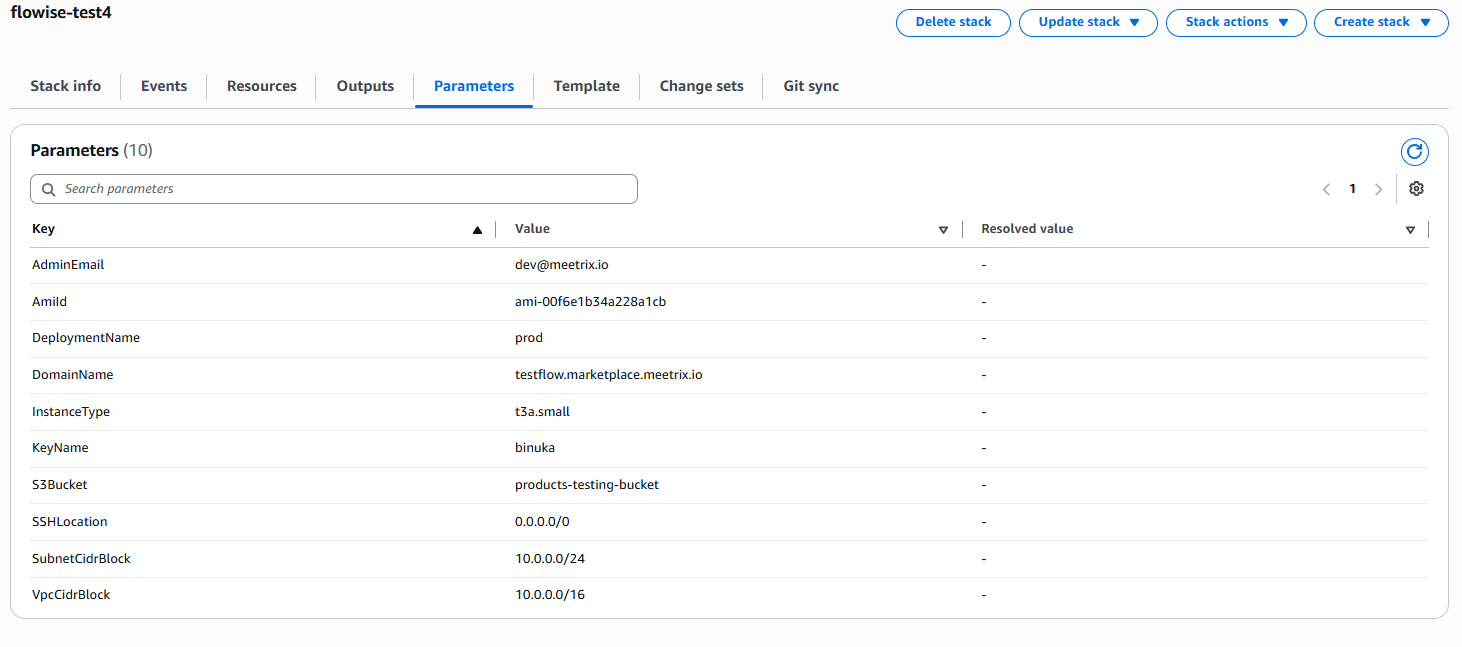
Step 2: Specify Stack Details
- Provide a unique "Stack name".
- Enter a value for "DeploymentName" (e.g.,
prod). - Provide a public domain for "DomainName". Flowise will automatically try to set up SSL if the domain is hosted on Route53. If unsuccessful, you must set up SSL manually.
- Choose an instance type for "InstanceType" (Recommended: t3a.medium).
- Enter the Flowise username for login.
- Enter the Flowise password for login.
- Select your SSH key pair for "KeyName".
- Set "SSHLocation" to
0.0.0.0/0to allow SSH from any IP, or restrict it to your own IP for better security. - Keep "SubnetCidrBlock" as
10.0.0.0/24. - Keep "VpcCidrBlock" as
10.0.0.0/16. - Click "Next".
Step 3: Configure Stack Options
- Choose "Roll back all stack resources" and "Delete all newly created resources" under the "Stack failure options" section.
- Click "Next".
Step 4: Review and Submit
- Review and verify all the details you have entered.
- Provide the "Admin Email" for SSL generation.
- Tick the box that says "I acknowledge that AWS CloudFormation might create IAM resources with custom names".
- Click "Submit".

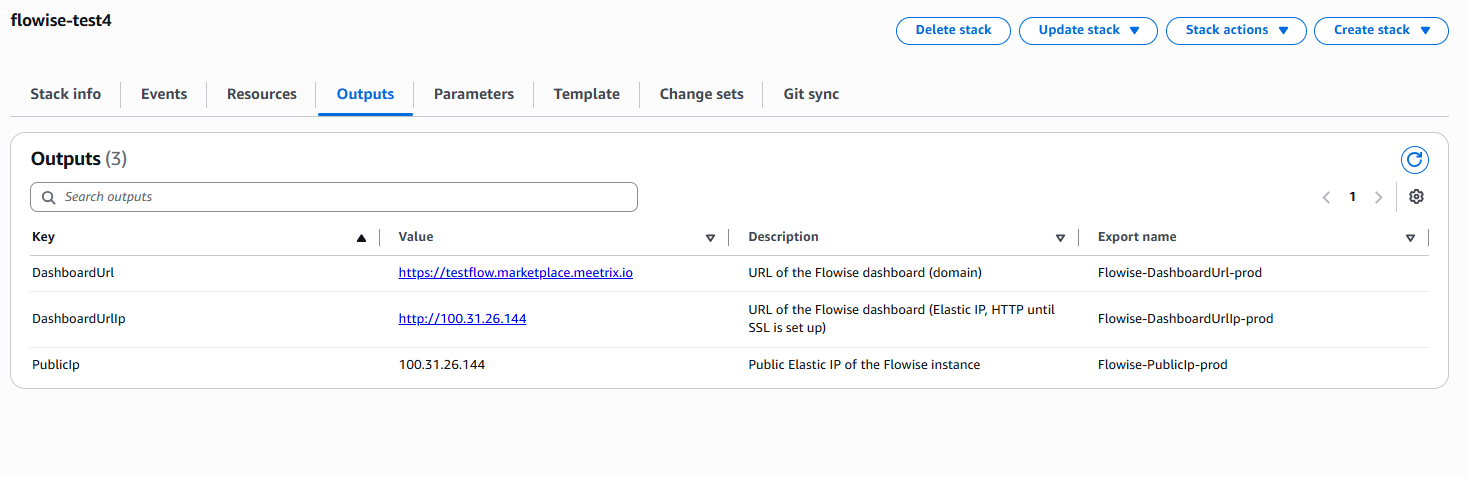
You will be directed to the CloudFormation stacks page. Please wait 5–10 minutes until the stack status shows CREATE_COMPLETE.

Update DNS
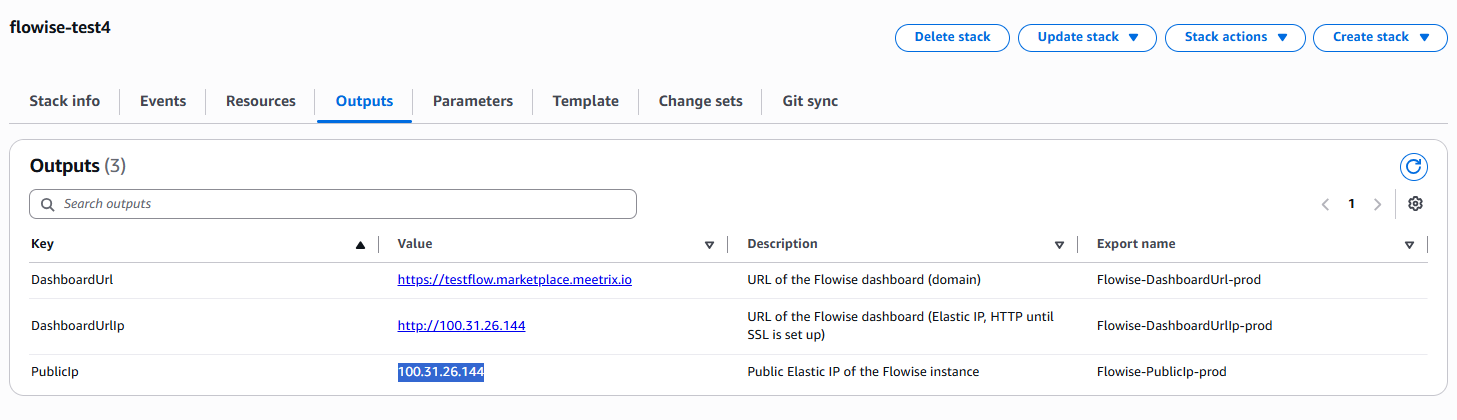
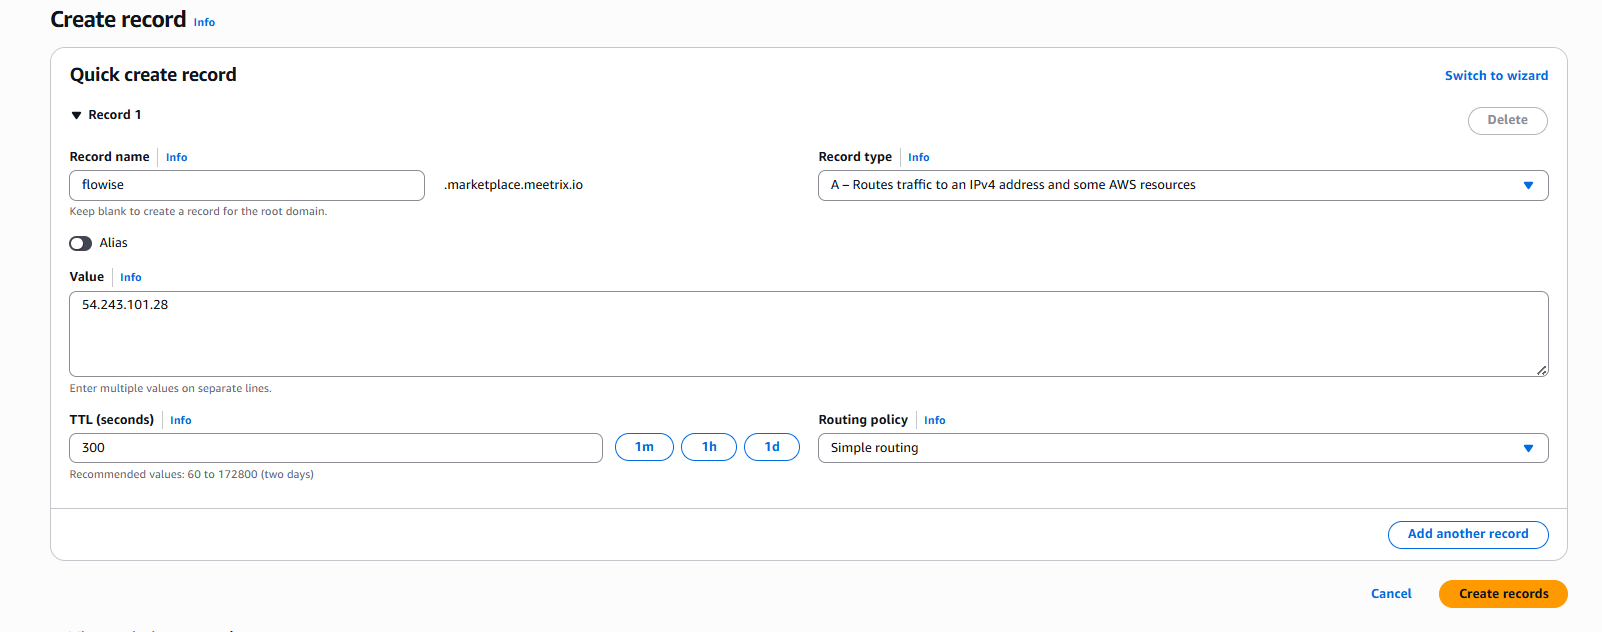
Step 1: Copy IP Address
Once the stack is created, open the "Outputs" tab of your CloudFormation stack and copy the public IP labeled "PublicIp".
Step 2: Update DNS
- Go to AWS Route 53 and navigate to "Hosted Zones".
- Click Create record.
- Add a record name and paste the copied PublicIp into the value textbox.
- Click "Save".
Access Flowise
Access Flowise using the "DashboardUrl" or "DashboardUrlIp" provided in the Outputs tab.
Note
Generate SSL Manually
Flowise will automatically try to set up SSL when a Route53-hosted domain is provided. If it fails, follow these steps to generate SSL manually.
Step 1: Copy IP Address
- Follow the Update DNS steps above, if not already done.
- Copy the Public IP indicated as "PublicIp" in the "Outputs" tab.
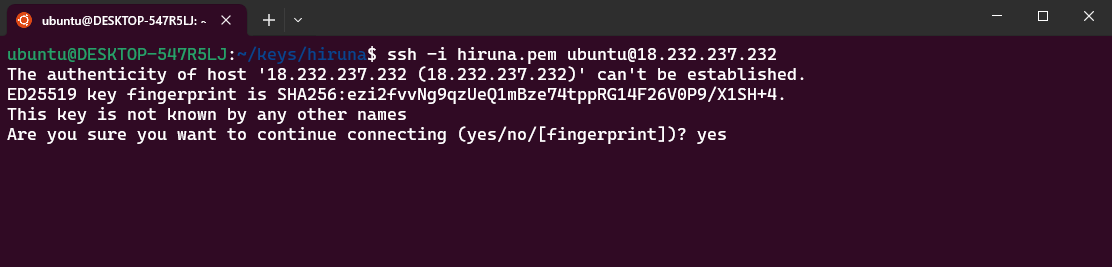
Step 2: Log in to the Server
- Open the terminal and navigate to the directory where your private key (
.pem) file is located. - Run:
ssh -i /path/to/your-key.pem ubuntu@<PublicIp>- Type
yeswhen prompted to accept the host fingerprint.
Step 3: Generate SSL
Run the following command and follow the prompts:
sudo bash /root/certificate_generate_standalone.shCheck Server Logs
Step 1: Log in to the Server
ssh -i /path/to/your-key.pem ubuntu@<PublicIp>Step 2: Check the Logs
sudo docker ps

sudo docker logs <container-id-prefix>
Shutting Down Flowise
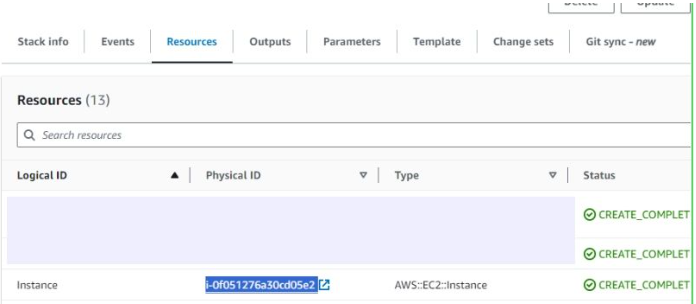
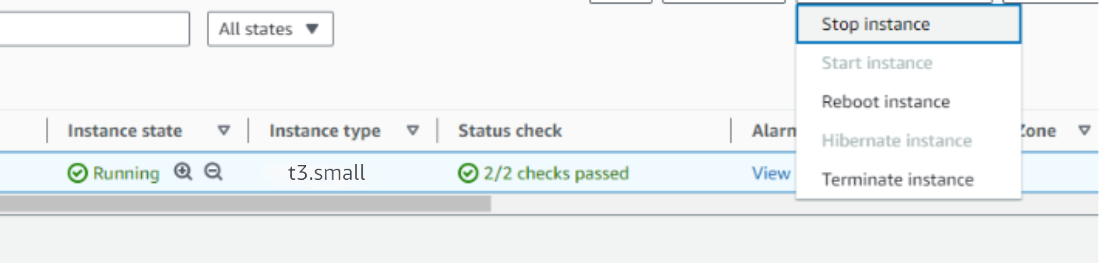
- In the CloudFormation stack, click the "Resources" tab and find the "Instance" link to navigate to the EC2 instance.
- In the EC2 console, select the instance checkbox and choose "Stop instance" from the "Instance state" dropdown. You can restart it at any time by selecting "Start instance".
Remove Flowise
To fully remove the deployment, delete the CloudFormation stack from the AWS Management Console under CloudFormation → Stacks by selecting the stack and clicking the "Delete" button. This will remove all associated AWS resources including the EC2 instance, VPC, and Elastic IP.
Upgrades
When a newer version of the Flowise AMI is published, we will update the product in AWS Marketplace. To upgrade, check the product version in the Marketplace. If a newer version is available, remove the previous deployment and re-launch using the updated AMI. Always back up any custom flows and configurations before removing.
Troubleshoot
- vCPU quota exceeded — if you see a quota error during stack creation, follow this guide to request a vCPU quota increase.

- Insufficient instance capacity — if the stack creation fails with an
InsufficientInstanceCapacityerror, try a different AWS region or retry at a later time.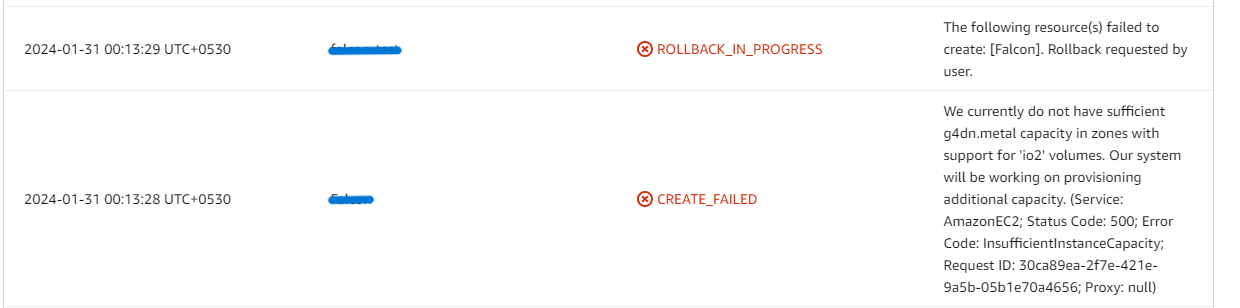
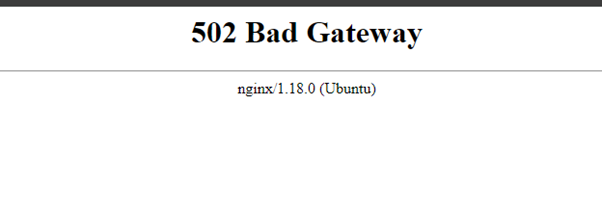
- API Dashboard Access Error — If you face the below error, when you try to access the API dashboard, please wait 5-10 minutes and then try.
- Disk usage full — check disk usage to ensure the instance storage is not full. Log into the server and run:
If the root volume is between 90–100% used, increase the EBS volume size following AWS documentation, then reboot the instance.
df -h
Conclusion
The Meetrix Flowise Deployment Guide helps you set up a production-ready LLM application builder on AWS quickly and reliably. Whether you're a DevOps engineer, AI developer, or startup founder, this guide provides everything you need to deploy Flowise, configure SSL, and start building intelligent workflows on your own infrastructure.
Technical Support
Reach out to Meetrix Support (aws@meetrix.io) for assistance with Flowise deployment issues.
Frequently Asked Questions
What is Flowise?
Flowise is an open-source, low-code platform that allows you to build powerful LLM-powered applications through a visual drag-and-drop interface. It enables you to create AI chatbots, agents, and LLM workflows without complex setup.
What are the prerequisites for deploying Flowise on AWS?
You need basic knowledge of AWS services (EC2, CloudFormation), an active AWS account with appropriate permissions, an SSH key pair in your target region, and sufficient vCPU limits. A registered domain name is optional but recommended for SSL setup.
Which instance type is recommended for Flowise?
t3a.medium is recommended as a baseline for running Flowise on AWS.
How does SSL get configured for Flowise?
Flowise will automatically try to set up SSL if the domain you provide is hosted on Route53. If it fails, you can manually generate SSL by SSHing into the server and running sudo /root/certificate_generate_standalone.sh.
How do I handle upgrades?
When a newer version of the Flowise AMI is published in AWS Marketplace, remove the previous deployment after backing up your custom flows and configurations, then relaunch using the updated AMI.
How do I get technical support?
Reach out to Meetrix Support at <a href='mailto:aws@meetrix.io'>aws@meetrix.io</a> for assistance with Flowise deployment issues.
Ready to Deploy Your Own Flowise Instance?
Get started in minutes with our pre-configured AMI and start building powerful LLM applications on your own AWS infrastructure.
Deploy Flowise from AWS Marketplace