Updating SSL Certificates in Jitsi Meet and TURN Servers within Kubernetes Deployments

Ensuring your Jitsi Meet platform has up-to-date SSL certificates is crucial. However, in Kubernetes deployments, this task is not as straightforward as on a conventional server. This blog will provide a step-by-step guide on how to achieve this. In a nutshell, we will use a cloud server to generate certificates for the relevant domains and deploy them using ‘kubectl’.
Assuming your Jitsi Meet domain is ‘my.domain.com’, and your TURN server's domain is ‘turn.my.domain.com’, kindly replace these placeholders with your actual domain names. This blog focuses on deployments that include both Jitsi Meet and HAProxy. If you have only Jitsi Meet, you should update the Jitsi Meet ConfigMap instead of the HAProxy ConfigMap (which we will discuss later in this blog). Additionally, please note that this setup is based on Google Kubernetes Engine (GKE), and some steps may differ depending on your cloud service provider. It's advisable to perform this update during your setup's downtime.
- Logging into a Server
As mentioned in the introduction, you'll need a cloud server with public internet access. Start by logging into the server and proceed with the steps outlined below. - Setting Up Certbotot : Run the following commands
sudo apt update
sudo apt install snapd
sudo snap install core; sudo snap refresh core
sudo apt remove certbot
sudo snap install --classic certbot
sudo ln -s /snap/bin/certbot /usr/bin/certbot
wget https://github.com/joohoi/acme-dns-certbot-joohoi/raw/master/acme-dns-auth.py
chmod +x acme-dns-auth.py
sed -i 's|#!/usr/bin/env python|#!/usr/bin/env python3|' acme-dns-auth.py
sudo mkdir /etc/letsencrypt
sudo mv acme-dns-auth.py /etc/letsencrypt/ - Obtaining the SSL Certificate
For my.domain.com
a. Run the following command
sudo certbot certonly --manual --manual-auth-hook /etc/letsencrypt/acme-dns-auth.py --preferred-challenges dns --debug-challenges -d my.domain.com
b. Add your email address when prompted and continue the process.
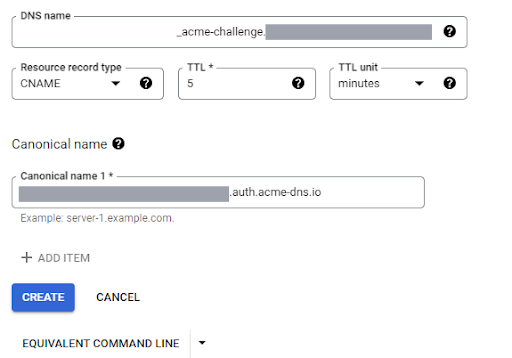
c. You will receive a message like “Please add the following CNAME record to your main DNS zone:”
( In the example below, we tried to get the certificates for both the domains at once. But it is better to get these two separately as described in the blog )

d. Log into the Google Cloud Console in browser and go to CloudDNS
e. Add CNAME record (Example record is given below), given as the output in step

f. Press Enter in the Terminal to continue
g. Certificate will be saved in the following path
Certificate is saved at: /etc/letsencrypt/live/my.domain.com/fullchain.pem
Key is saved at: /etc/letsencrypt/live/my.domain.com/privkey.pem
For turn.my.domain.com
a. Run the following command
sudo certbot certonly --manual --manual-auth-hook /etc/letsencrypt/acme-dns-auth.py --preferred-challenges dns --debug-challenges -d turn.my.domain.com
b. Add DNS record and proceed as the previous step
c. Certificates will be saved in the following path
Certificate is saved at: /etc/letsencrypt/live/turn.my.domain.com/fullchain.pem
Key is saved at: /etc/letsencrypt/live/turn.my.domain.com/privkey.pem
3. Adding Certificates
a. Save certificates and private keys in local files.
b. Install kubectl and connect to the cluster
c. Update the HAProxy/Meet ConfigMap YAML file, used during the Jitsi setup, with the certificate and key for ‘my.domain.com’ according to the relevant format.
d. Update the TURN ConfigMap YAML file with the certificate and key for ‘turn.my.domain.com’ according to the relevant format.
e. Run the following commands
kubectl config use-context <your-context-name>
kubectl apply -f <haproxy-configmap-yaml-filename>
kubectl apply -f <turn-configmap-yaml-filename>
f. Restart HAProxy and Turn Deployments
kubectl get deployments
kubectl rollout restart deployment <haproxy-deployment-name>
kubectl rollout restart deployment <turn-deployment-name>
g. Remove added DNS records
h. You can now stop the instance which is used to get the certificate, if it is no longer needed.
