Install Mistrallite on AWS: A Comprehensive Guide to Using Preconfigured AMI


Introduction: Mistrallite AI for Long-Context Processing
In the ever-evolving world of artificial intelligence, the ability to process extensive textual data accurately and efficiently stands as a cornerstone for innovation. Enter Mistrallite, a sophisticated AI model developed by Amazon Web Services, which has revolutionized how businesses and developers handle complex, long-context tasks. This introduction delves into the capabilities of Mistrallite and explores the significant advantages of deploying it through a preconfigured Amazon Machine Image (AMI) on AWS.
Unveiling Mistrallite: A Leap in Language Processing
Mistrallite is not just another addition to the plethora of AI models; it is a finely tuned-powerhouse designed for depth and scale. Based on the robust Mistral-7B-v0.1 architecture, Mistrallite enhances this foundation with the capability to process up to 32,000 tokens in a single pass. This substantial increase in context length allows for a more comprehensive understanding and generation of text, which is critical in applications ranging from detailed document analysis to extensive data interpretation across legal, academic, and scientific fields.
The core strength of Mistrallite lies in its sophisticated adaptations, such as improved Rotary Positional Embeddings and an extended sliding window technique during training. These enhancements allow Mistrallite to maintain context over longer stretches of text, drastically reducing the loss of meaning over distance that plagues many conventional models. As a result, it excels in tasks that involve detailed content retrieval, complex question answering, and dynamic summarization, providing outputs that are not only accurate but also contextually rich.
The Advantages of a Preconfigured AMI on AWS
Deploying Mistrallite via a preconfigured AMI offers numerous benefits that simplify and streamline the integration process. This method significantly reduces the setup time and technical challenges commonly associated with custom AI deployments. Here are some of the key benefits:
- Simplicity and Speed: With just a few clicks, users can launch Mistrallite on any compatible AWS instance, bypassing the intricate steps of manual setup. This ease of deployment ensures that even users with minimal technical background can start leveraging the power of Mistrallite almost immediately.
- Consistency and Reliability: Each AMI is crafted and tested by AWS experts to ensure that it not only integrates seamlessly with AWS services like EC2 and SageMaker but also provides a stable and reliable environment for running Mistrallite. This consistency is crucial for businesses that rely on predictable performance and uptime.
- Scalability and Flexibility: AWS's infrastructure allows users to scale their Mistrallite deployments effortlessly to match their workload requirements. Whether scaling up during peak analysis times or scaling down to save on costs, AWS provides the flexibility to adjust resources dynamically.
- Security and Compliance: Deploying through AWS also means users benefit from built-in security measures, including network isolation, data encryption, and compliance with international standards. This security assurance is vital for enterprises handling sensitive or proprietary data.
Mistrallite represents a significant advancement in the field of AI-driven text analysis, offering unparalleled capabilities for managing and understanding large datasets. By choosing a preconfigured AMI for installation, users can harness these advanced features with minimal setup time, enjoying a blend of high performance, scalability, and security that AWS platforms are known for. This combination makes Mistrallite not only a powerful tool but also an accessible solution for a wide range of applications in today’s data-driven landscape.
Prerequisites for Installing Mistrallite on AWS
Before diving into the installation of Mistrallite using a preconfigured Amazon Machine Image (AMI) on AWS, there are several prerequisites you'll need to meet. Ensuring you have the correct setup not only facilitates a smoother installation process but also optimizes the performance of the Mistrallite model in your projects. This section provides a comprehensive guide on what you need to get started and how to set up an AWS account if you don’t already have one.
Essential Requirements
To effectively deploy Mistrallite on AWS, you will need the following:
- AWS Account: A basic requirement is having an active AWS account. This account is your gateway to accessing AWS services, including EC2, CloudFormation, and IAM, which are crucial for running Mistrallite.
- IAM Permissions: Ensure that your AWS account has IAM permissions that allow you to create and manage AWS resources. This includes permissions to launch EC2 instances, manage IAM roles, and create CloudFormation stacks. Proper IAM settings help safeguard your deployment and ensure that operations run without unnecessary permission issues.
- Knowledge of AWS Services: A fundamental understanding of AWS services, particularly Amazon EC2 (Elastic Compute Cloud), Amazon CloudFormation, and IAM (Identity and Access Management), is highly beneficial. These services are integral to setting up and managing the infrastructure that will host the Mistrallite model.
- System Requirements: Check the specific requirements such as the type of EC2 instance recommended for Mistrallite, which typically includes instances with adequate vCPU and memory configurations to handle the computational demands of processing large contexts.
Setting Up an AWS Account
If you do not have an AWS account, follow these steps to create one. The process is straightforward and opens up a vast array of AWS services beyond just hosting Mistrallite.
Step 1: Visit the AWS Homepage
- Navigate to AWS Home and click on the ‘Create an AWS Account’ button. This button can usually be found at the top right of the screen.
Step 2: Fill in Your Account Details
- Start Registration: Enter your email address, choose ‘I am a new user,’ and click "Sign in using our secure server."
- Enter Your Contact Information: Fill in your contact information and choose your account type (personal or company).
- Payment Information: Input your credit card details. AWS will verify your card by charging a small amount, which is later reimbursed. This step is crucial as AWS uses a pay-as-you-go pricing model.
Step 3: Confirm Your Identity
- Phone Verification: You will be asked to verify your phone number through a quick automated call from AWS. Enter the PIN you are given over the phone to complete verification.
Step 4: Choose a Support Plan
- Select a Support Plan: Choose one of the available support plans that best fits your needs. The basic plan is free and can be upgraded any time to gain more extensive support services.
Step 5: Secure Your Account
- Activate Multi-Factor Authentication (MFA): For added security, set up MFA by linking a mobile app or a hardware device that generates time-based, one-time codes.
After completing these steps, your AWS account will be ready to use. You can now proceed to the AWS Management Console, where you can manage your AWS resources and prepare for the installation of Mistrallite.
Proper preparation involving account setup and understanding permissions is crucial for a smooth installation of Mistrallite on AWS. By following these preliminary steps, you ensure that your deployment of the Mistrallite model is not only successful but also secure and optimized for high performance.
Step-by-Step Installation Guide for Mistrallite on AWS
Deploying Mistrallite using a preconfigured Amazon Machine Image (AMI) involves a series of steps designed to streamline the setup process on AWS. This guide provides detailed instructions from accessing the AWS Marketplace to configuring your DNS settings.
Step 1: Accessing the AWS Marketplace
Logging into the AWS Management Console
- Navigate to the AWS Management Console:
- Open your web browser and visit the AWS Management Console login page.
- Enter your AWS account credentials (email and password). If your account is secured with Multi-Factor Authentication (MFA), you will need to provide additional verification.
Searching for the Mistrallite AMI
- Locate the AMI:
- Once logged in, use the search bar at the top of the console to search for “AWS Marketplace” and select it from the dropdown.
- In the AWS Marketplace, type “Mistrallite” into the search field and press enter. This will bring up the listing for the Mistrallite AMI.
Step 2: Subscribing to the AMI
How to Subscribe
- Select the Mistrallite AMI from the search results.
- Click on the title of the AMI to view detailed information.
- Click ‘Continue to Subscribe’ to begin the subscription process. You may need to log in again if prompted.
Understanding the Terms and Conditions
- Review the Terms: Before finalizing the subscription, carefully read through the terms and conditions associated with the AMI. This includes pricing details, usage rights, and any restrictions imposed by the provider.
- Accept the Terms: If you agree with the conditions, click on “Accept Terms”. This will finalize your subscription, allowing you to configure and launch the AMI.
Step 3: Configuring the AMI for Deployment
Choosing the Right EC2 Instance Type and Configuration Settings
- Select the Instance Type: Choose an instance type that matches the requirements of Mistrallite for optimal performance (e.g., g4dn.xlarge for GPU acceleration).
- Configure Instance Settings: Set up configuration details like the amount of RAM and CPU based on your processing needs.
Configuration Options
- Region Selection: Select an AWS region that is closest to your user base to reduce latency.
- Instance Size: Consider the computational load and select an appropriate instance size. AWS provides a variety of instance sizes to cater to different usage scenarios.
Step 4: Launching the AMI
Using AWS CloudFormation
- Navigate to CloudFormation: From the AWS Management Console, select “Services” and then choose “CloudFormation” under Management & Governance.
- Create a New Stack: Click on “Create Stack” and use the preconfigured Mistrallite AMI template provided during the subscription process.
- Specify Stack Details: Enter the required stack information, such as stack name and parameters.
- Review and Launch: Double-check your settings, acknowledge that AWS might create IAM resources, and click “Launch”.
Importance of Correct VPC and Subnet Settings
- Ensure that the VPC and subnet selected are properly configured for external connectivity and security. This affects how the instance communicates with other AWS services and the internet.
Step 5: Setting Up the Instance
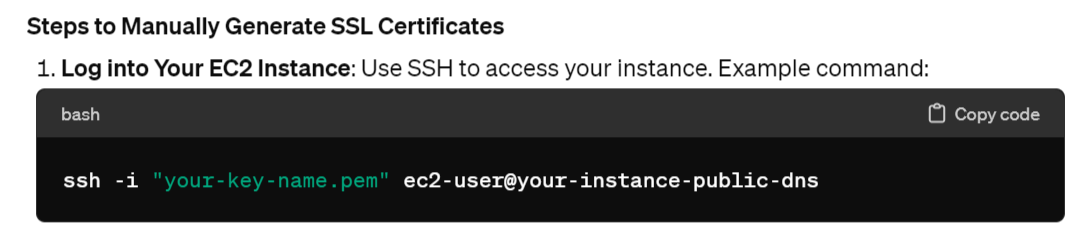
SSH into Your New EC2 Instance
- Access your EC2 Instance: Use an SSH client with your instance’s public DNS and the private key file associated with your key pair
(e.g., ssh -i "your-key-name.pem" ec2-user@ec2-198-51-100-1.compute-1.amazonaws.com).
Initial Server Setup and Security Best Practices
- Security Configuration: Configure firewalls and security groups to limit access. Regularly update your systems and monitor access logs.
Step 6: Configuring DNS Settings
Setting Up DNS
- Configure Route 53: If using AWS Route 53, create a new record set that points to your EC2 instance’s public IP.
- Update DNS Records: For other DNS providers, update your DNS settings to point your domain to the new instance’s public IP.
Associating Your Domain Name
- Ensure that the domain name is correctly associated with your public IP in the DNS settings to facilitate easy access to your deployed Mistrallite application.
By following these detailed steps, you can efficiently set up Mistrallite on AWS, ensuring a robust deployment that leverages AWS’s scalable infrastructure. Each step is crucial in building a secure and efficient environment for running advanced AI applications with Mistrallite.
Full MistralLite Installation Guide
Post-Installation Configuration for Mistrallite on AWS
After successfully installing the Mistrallite AMI on AWS, it is essential to perform post-installation configurations to ensure the system is secure, validated, and maintained efficiently. This includes setting up SSL certificates, validating the installation, and establishing protocols for regular maintenance and upgrades.
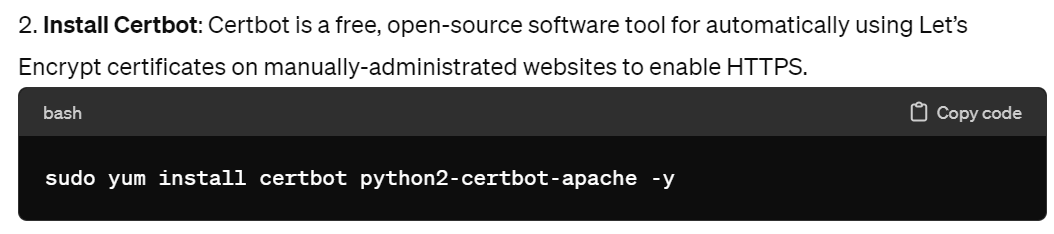
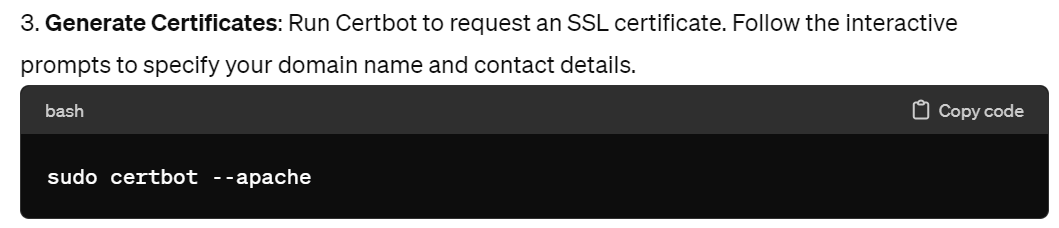
Generating SSL Certificates
Secure Socket Layer (SSL) certificates are crucial for protecting the data transmitted between your users and the Mistrallite application hosted on AWS. Here’s how you can manually generate and install these certificates if they are not automatically configured.
Steps to Manually Generate SSL Certificates

Tools and Commands Needed for SSL Setup
- Certbot: Automates the certificate issuance and installation with minimal downtime.
- OpenSSL: For generating private keys and certificate signing requests (CSRs).
- Apache or Nginx: Web servers that need to be configured to serve HTTPS traffic.
Validating the Installation
Ensuring that Mistrallite is correctly installed and operational involves a few verification steps and understanding how to troubleshoot common issues.
How to Verify That Mistrallite is Running Correctly

Troubleshooting Common Issues
- Service Fails to Start: Ensure all environment variables and dependencies are correctly configured.
- Connectivity Issues: Check security group and network ACL settings if the Mistrallite application is not accessible from the internet.
Maintenance and Upgrades
Maintaining your AWS instance running Mistrallite efficiently involves regular monitoring, backups, and updates.
Best Practices for Maintaining Your AWS Instance
- Regular Monitoring: Utilize AWS CloudWatch to monitor performance and set up alarms for unusual activity.
- Backup Regularly: Use AWS Backup or snapshot features to create backups of your instance and data to prevent data loss.
How to Handle Updates and Upgrades to the Mistrallite AMI
- Check for Updates: Regularly visit the AWS Marketplace page for Mistrallite to check for new versions of the AMI.
- Apply Updates: Follow the provided instructions to update the AMI or migrate to a new version. Ensure minimal downtime and data integrity by testing in a staging environment before applying to production.
Enhancing Mistrallite Deployment on AWS: Security, Performance, Cost
Deploying Mistrallite on AWS not only requires a smooth installation but also a focus on security, performance, and cost management to ensure an optimized and safe environment. This section covers critical enhancements and configurations for Mistrallite, including setting up IAM roles, encryption, instance performance tuning, and more.
Security Enhancements
IAM Roles and Policies
- Purpose: Limit access to AWS resources necessary for Mistrallite to enhance security.
- Implementation:
- Create IAM Roles: Navigate to the IAM console, create a new role, and attach policies that grant necessary permissions for EC2, S3, CloudWatch, and other services used by Mistrallite.
- Least Privilege Principle: Apply the least privilege principle by granting only the permissions necessary to perform tasks.
Encryption
- Instance Storage Encryption:
- EBS Encryption: Turn on encryption for EBS volumes to secure your data at rest using AWS managed keys (AWS KMS) or customer-managed keys.
- Data in Transit:
- SSL/TLS: Ensure that data transmitted to and from the instance is encrypted using SSL/TLS by configuring your load balancers and application gateways accordingly.
Performance Optimization
Instance Performance Tuning
- Optimized Instance Type: Choose an instance type that matches the performance requirements of Mistrallite, such as compute-optimized instances for CPU-intensive tasks.
- Enhance I/O Performance: Use provisioned IOPS SSD (io1) volumes for high-performance database applications and frequent read/write operations.
Load Balancing
- AWS Elastic Load Balancing (ELB): Implement ELB to distribute incoming application traffic across multiple EC2 instances, improving fault tolerance and responsiveness.
- Setup: Configure ELB in the EC2 management console, and link it to your EC2 instances running Mistrallite.
Cost Management
Cost Estimation
- AWS Pricing Calculator: Utilize the AWS Pricing Calculator to estimate the monthly expenses for the resources used by Mistrallite.
- Include Costs: Calculate costs for EC2 instances, EBS volumes, data transfer, and additional services like ELB and Route 53.
Cost Optimization Tips
- Reserved Instances: Purchase reserved instances for significant savings over on-demand pricing if you plan to use Mistrallite continuously.
- Spot Instances: Use spot instances for non-critical background tasks to reduce costs.
- Auto-Scaling: Implement auto-scaling to adjust the number of instances automatically based on the load, reducing costs during low usage times.
Advanced Configuration
Auto-Scaling Setup
- Configure Auto-Scaling: Set up auto-scaling for Mistrallite to handle load variations efficiently. This includes defining scaling policies based on specific metrics like CPU utilization or network traffic.
Backup and Disaster Recovery
- AWS Backup: Implement AWS Backup to automate and manage backups across AWS services.
- Disaster Recovery: Plan and implement a disaster recovery strategy that includes data replication and quick recovery capabilities to minimize downtime.
Integration Capabilities
API Integration
- AWS Lambda: Integrate Mistrallite with AWS Lambda for executing automated tasks in response to events.
- AWS S3: Connect Mistrallite to AWS S3 for scalable storage solutions, facilitating extensive data analysis and backup.
Third-Party Integrations
- Database Integration: Integrate with external databases like PostgreSQL or MongoDB for enhanced data management capabilities outside of AWS.
- Analytics Tools: Link Mistrallite with analytics platforms like Tableau or PowerBI for advanced data visualization and analysis.
Conclusion
Deploying Mistrallite on AWS unlocks a world of potential for organizations that aim to harness advanced AI for processing extensive and complex datasets. This comprehensive guide has outlined the essential steps to install Mistrallite using a preconfigured AMI and provided strategies for optimizing performance, securing deployments, and managing operational costs efficiently. As we wrap up, let’s summarize the significant advantages Mistrallite brings to your AI capabilities and encourage further exploration into its extensive features.
Mistrallite stands out for its ability to process up to 32,000 tokens, making it an invaluable tool for fields that require deep analysis of large texts, such as legal documentation, academic research, and comprehensive content management. This capability allows businesses to delve deeper into data insights that go beyond the reach of shorter context models. The use of a preconfigured AMI on AWS simplifies the setup process, enabling rapid deployment and minimizing the need for extensive IT infrastructure modifications.
AWS's scalable infrastructure ensures that as your data processing requirements grow, your Mistrallite deployment can expand seamlessly. This adaptability is supported by AWS’s flexible management of instances and comprehensive pricing models, which include options for on-demand, reserved, and spot instances. Such flexibility allows organizations to optimize their operational expenditures while maintaining high performance and reliability. Additionally, AWS’s robust security measures, including comprehensive IAM roles and SSL encryption, protect your data from unauthorized access and potential breaches, ensuring a secure deployment.